
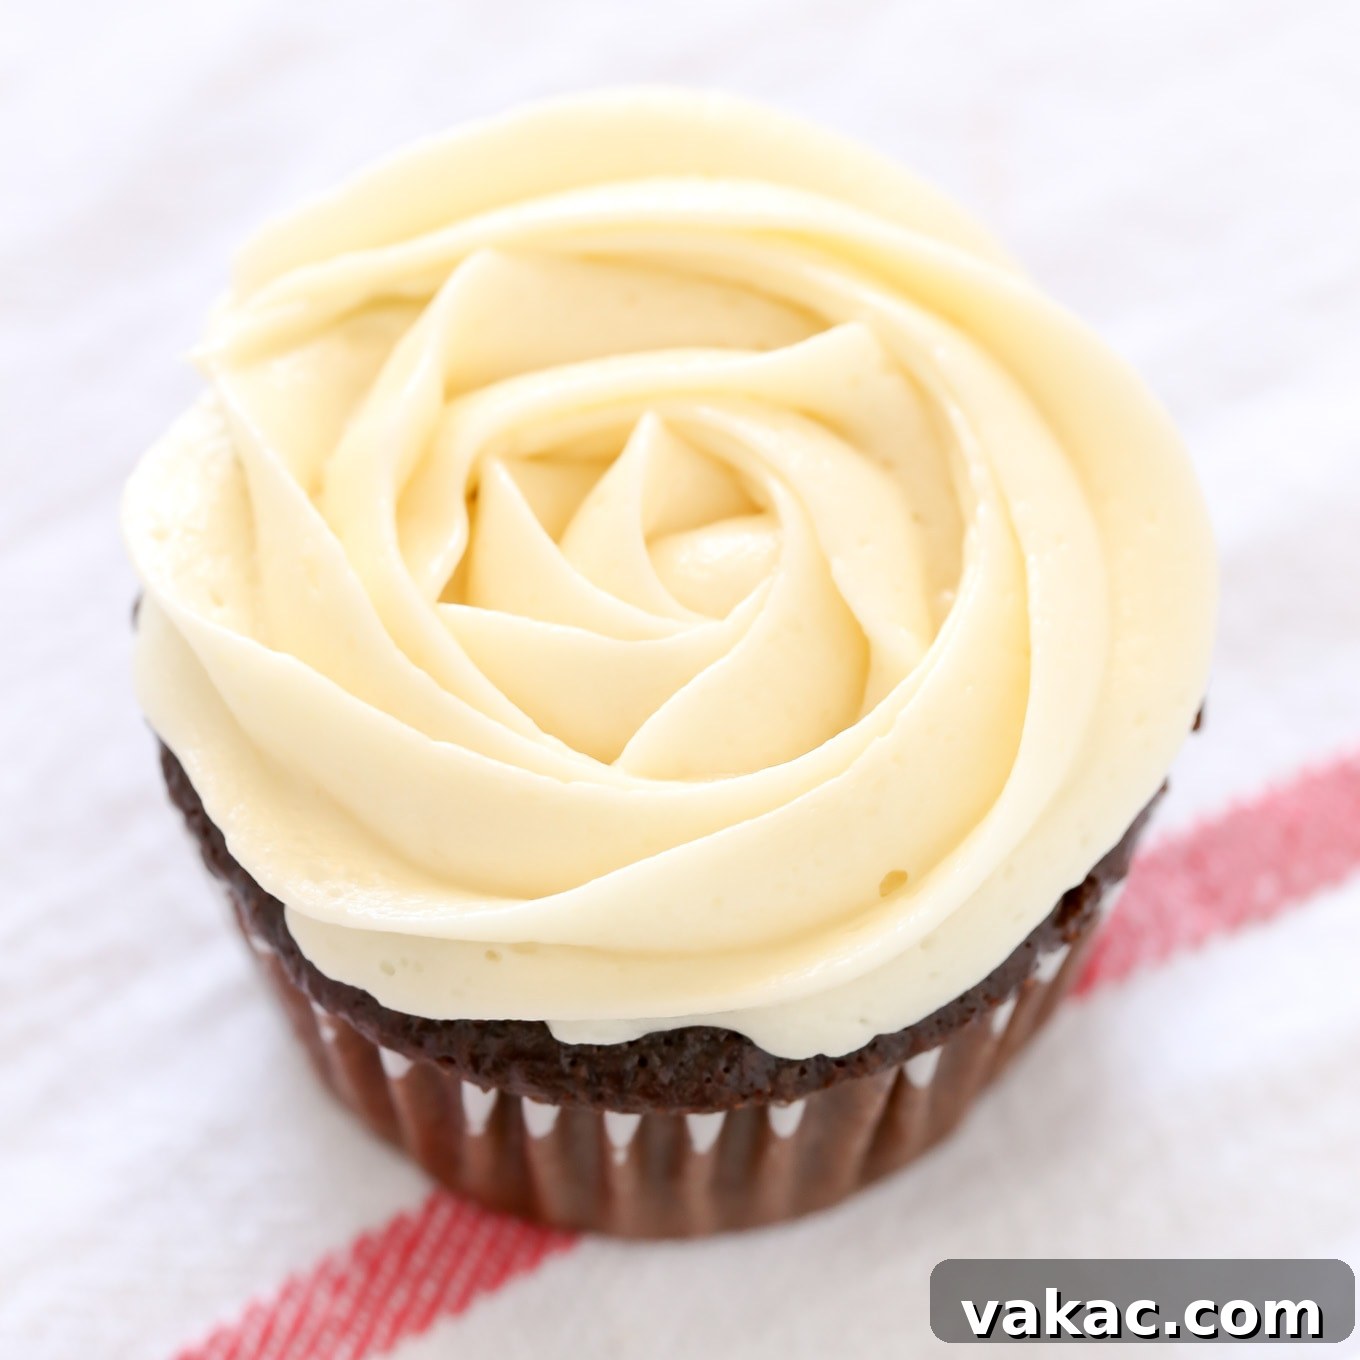
Transform your homemade treats into bakery-quality masterpieces! This comprehensive tutorial will guide you through preparing your piping bag, mastering the easiest filling techniques, and frosting cupcakes like a true professional. Get ready to impress with beautiful buttercream swirls and elegant roses!
I distinctly remember my first attempt at piping frosting onto cupcakes. Having spent considerable time in the kitchen and feeling confident with my baking skills, I decided to prepare a batch of cupcakes for my colleagues. A quick trip to the store for some basic piping bags and an inexpensive tip, and I was ready to embark on my decorating journey at home.
With an optimistic spirit, I prepped my piping bag, loaded it with frosting, and began to decorate. It was in that very moment I realized that frosting cupcakes isn’t quite as intuitive as it seems, especially when you’re navigating it without proper guidance. To be completely honest, the results were far from pretty – a testament to my lack of technique and experience.
That initial humbling experience sparked a determination within me. I dedicated myself to experimenting and testing various piping methods until I discovered the most effective and straightforward techniques for decorating cupcakes. The methods I’m excited to share with you today are incredibly simple, yet consistently yield stunning results. Say goodbye to lopsided, awkward frosting! Instead, prepare to create perfect, elegant swirls and delicate roses atop every single cupcake.
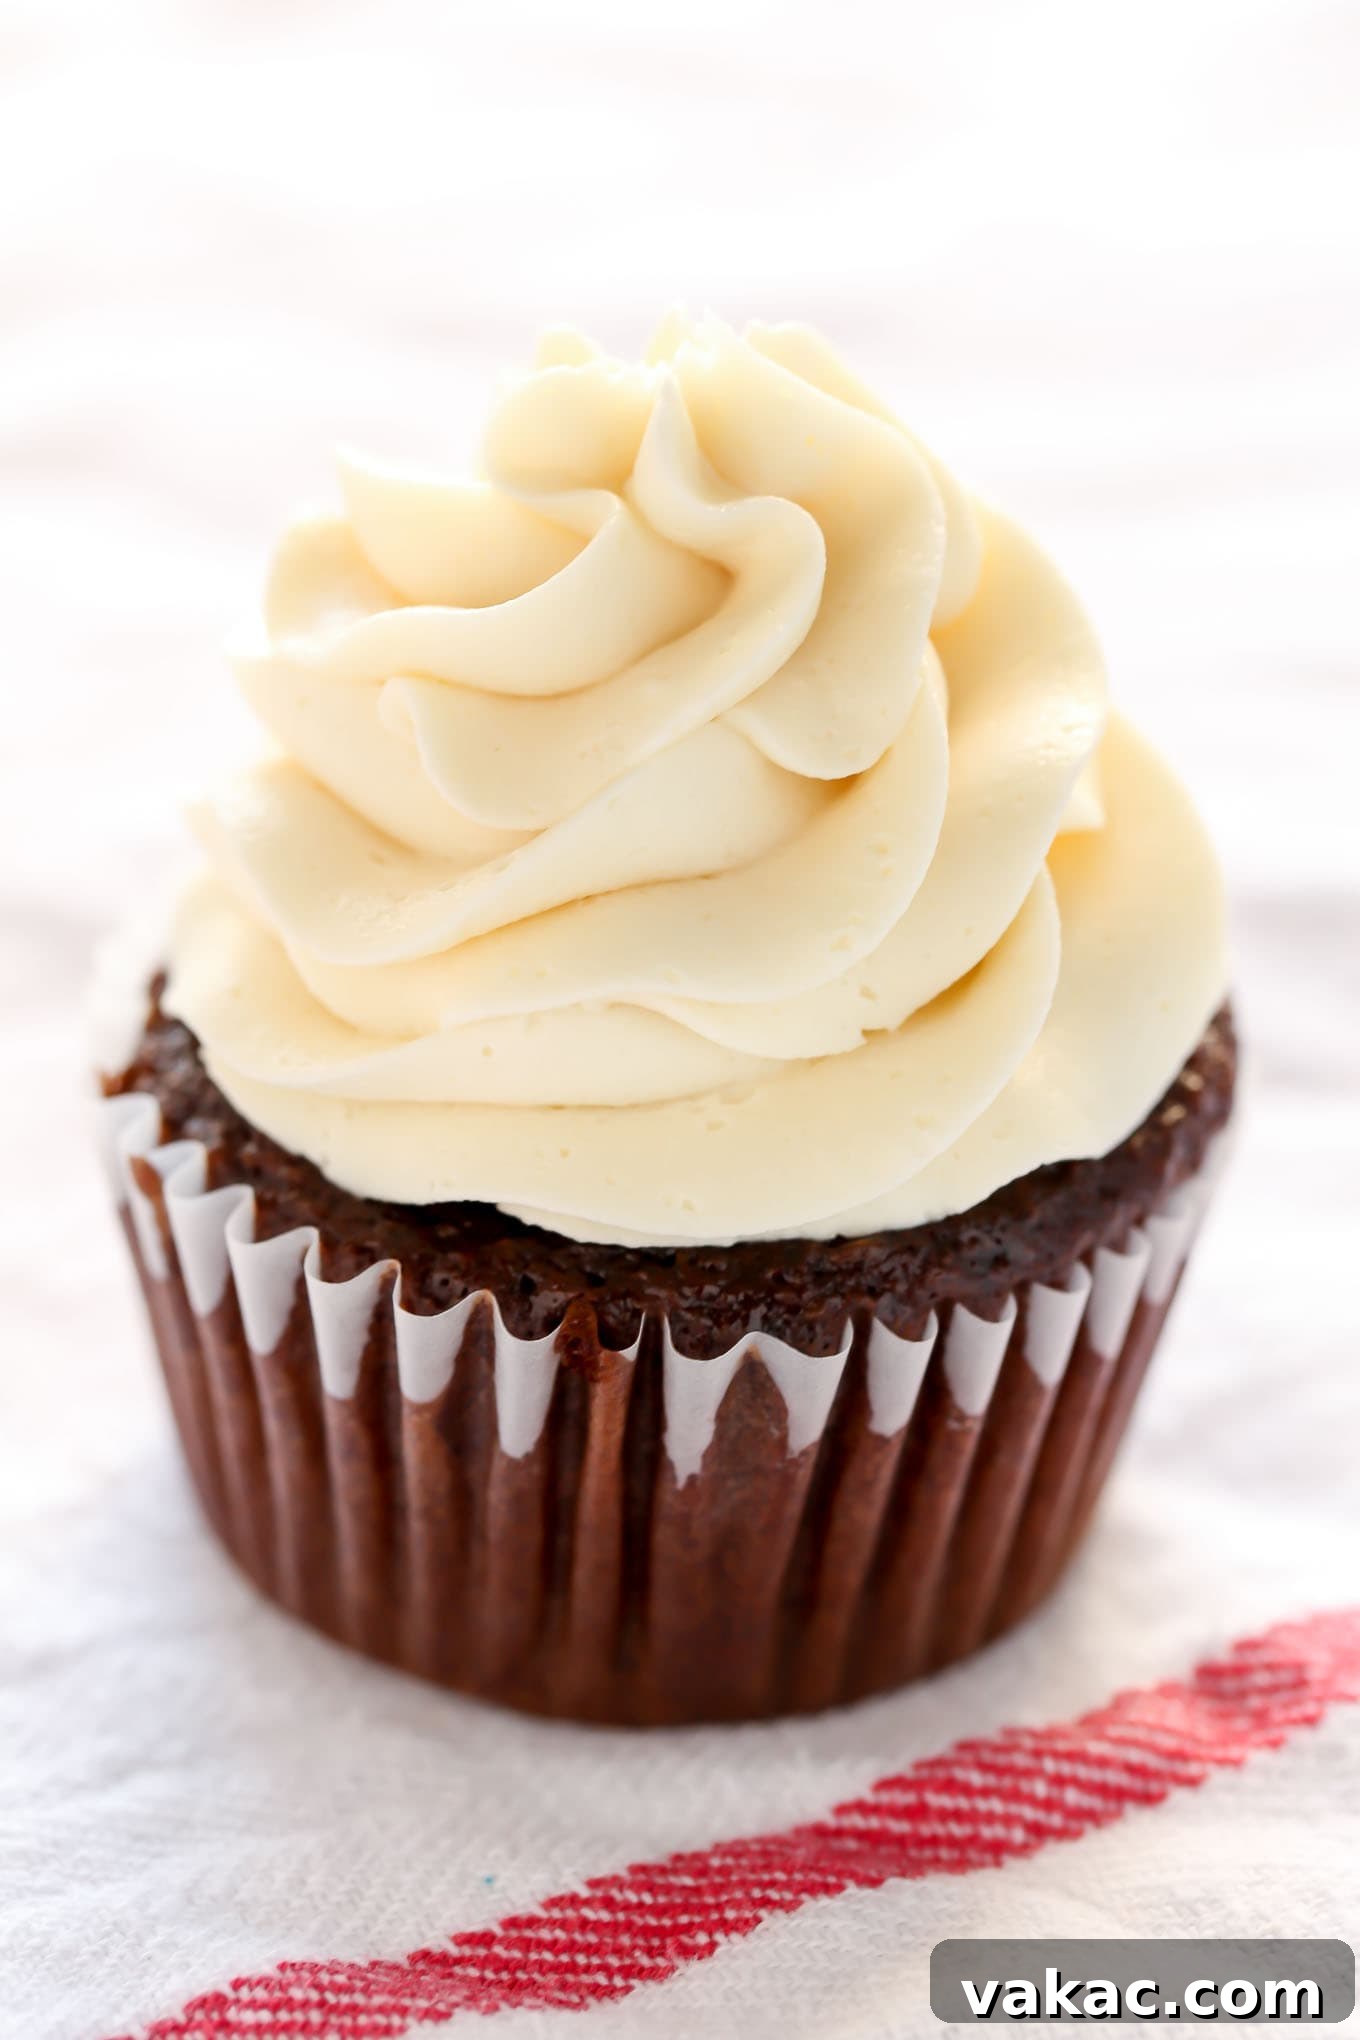
Eager to uncover these decorating secrets? I’ve meticulously crafted an easy-to-follow tutorial that covers two of my absolute favorite and most versatile decorating styles: the beautiful tall bakery-style swirl (as showcased above) and the classic buttercream rose. These techniques are not only achievable for beginners but also utilize the same piping tip, making them ideal for anyone looking to elevate their cupcake game without needing a multitude of specialized tools.
So, let’s dive in and transform your cupcake decorating skills!
Essential Tools for Professional Cupcake Decorating
Before we begin piping, let’s ensure you have the right equipment. Having the correct tools makes all the difference in achieving those flawless, bakery-style finishes.
First and foremost, you’ll need a piping bag. You have the choice between reusable silicone piping bags, which are durable and eco-friendly, or disposable piping bags, which offer convenience and easy cleanup. Both options perform excellently; the choice often comes down to personal preference. I personally lean towards disposable bags for their ease of use, but feel free to choose whichever suits your baking style best.
Secondly, a crucial component is the piping tip. These small but mighty tools are responsible for creating the intricate patterns and shapes of your frosting. A few of my go-to tips, known for their versatility and beautiful results, include the Wilton 1M star tip, the Wilton 2D drop flower tip, and the Wilton 2A round piping tip. These tips are widely available at craft stores like Michaels or even larger retailers like Walmart, typically priced between $1-$2 each. For this specific tutorial, I’ll be demonstrating with the incredibly popular and versatile Wilton 1M tip.
Step-by-Step: Preparing Your Piping Bag
Proper preparation of your piping bag is the foundation for effortless and beautiful frosting. Here’s how to set it up correctly:
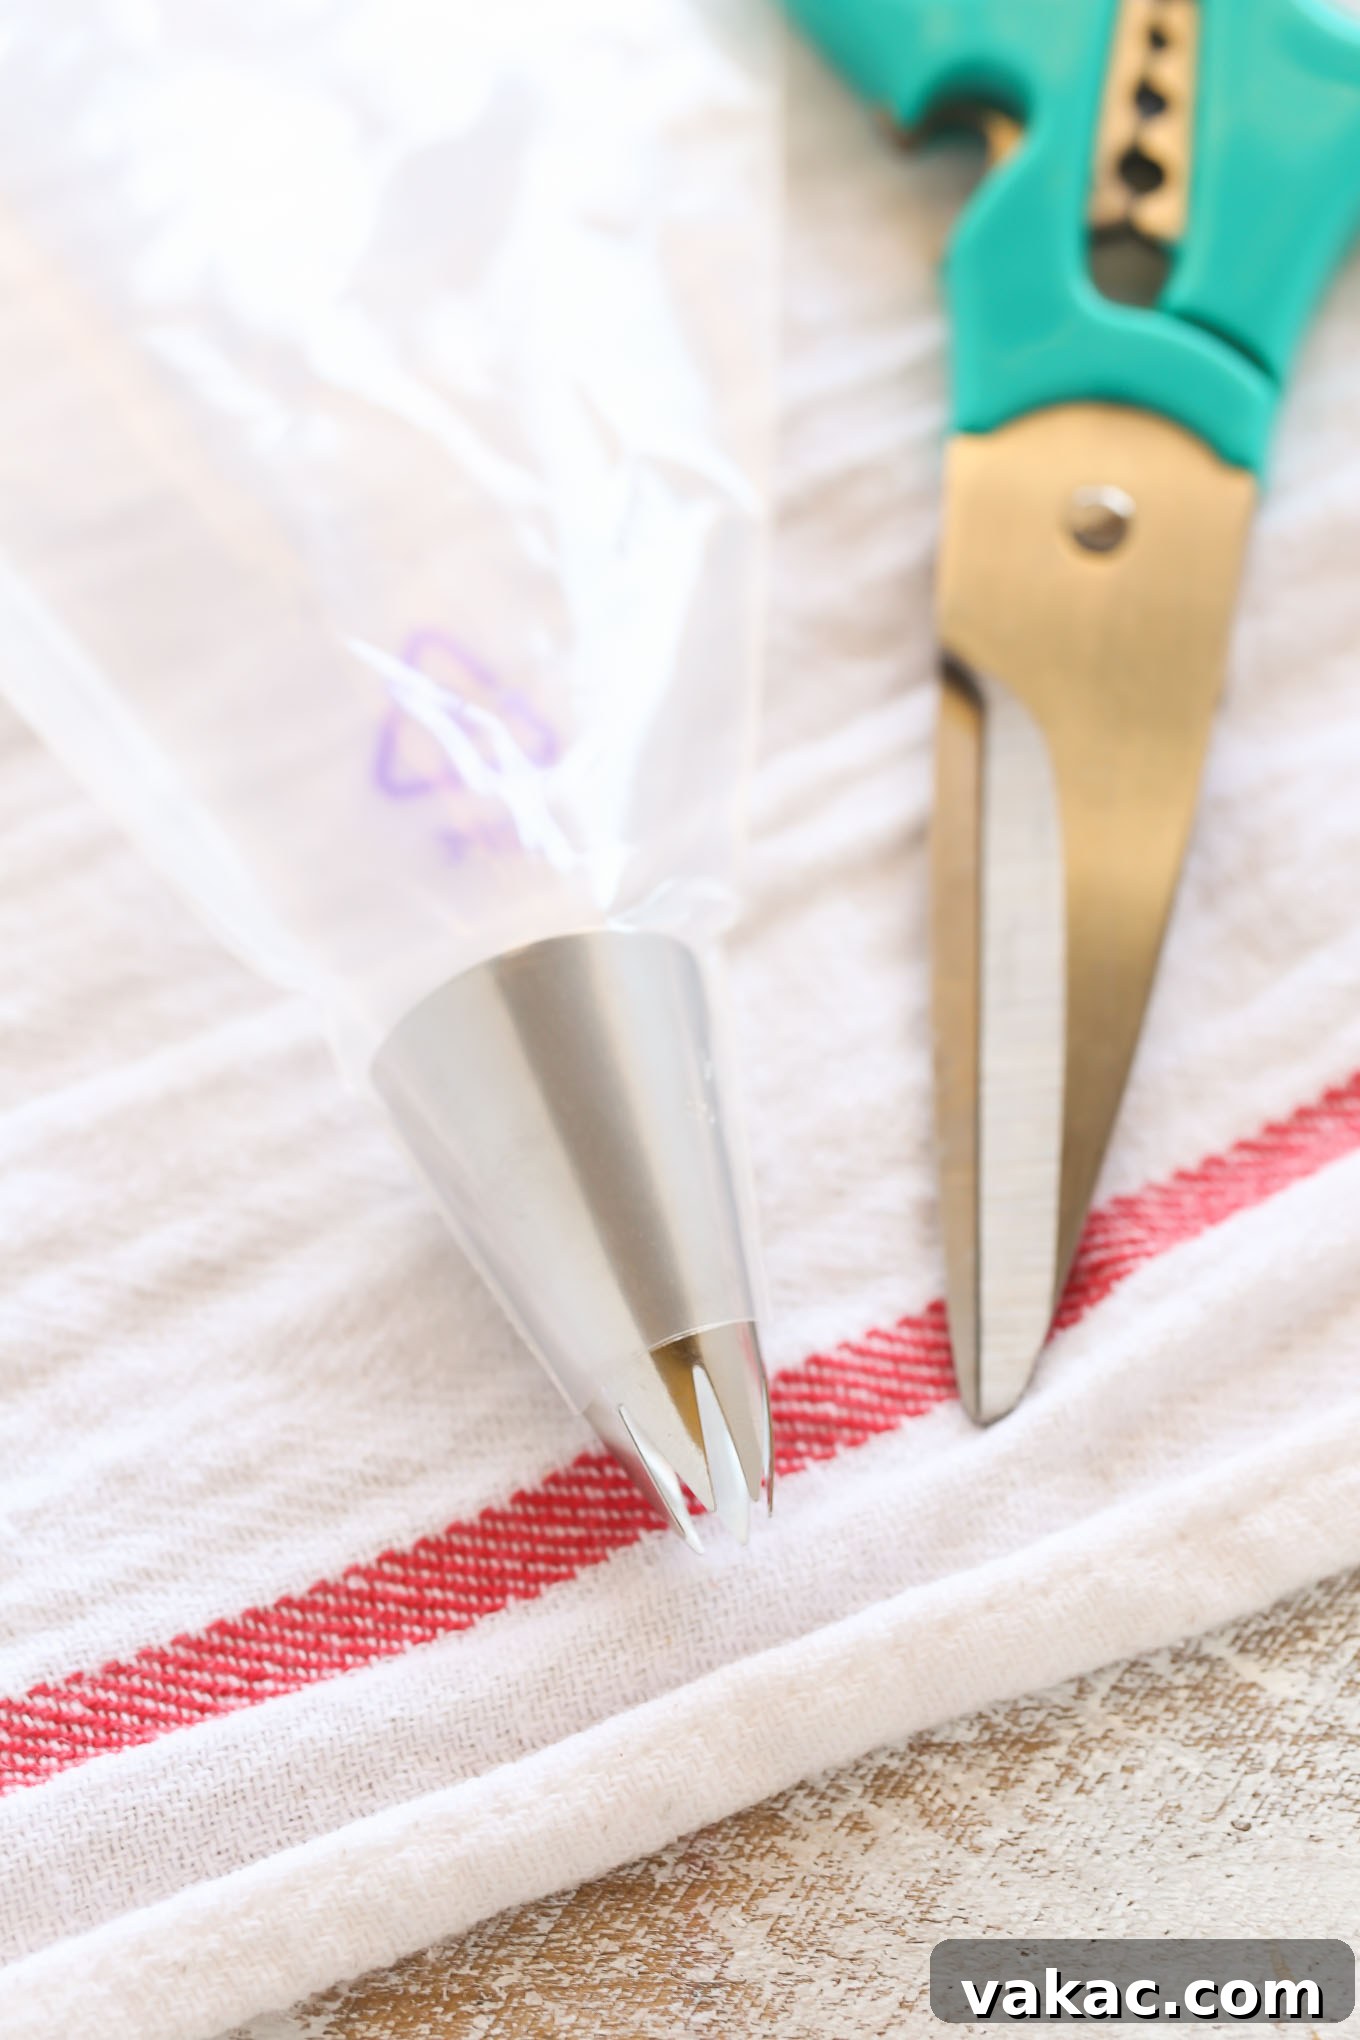
Start by taking your chosen piping bag. Locate the very end of the bag, which is typically tapered. Using a pair of sharp scissors, snip off a small portion of this tapered end. The key here is to cut just enough so that the piping tip can be inserted snugly into the opening, with approximately half of the tip protruding from the bag. Ensure the opening isn’t too large, or the tip might fall out during piping, and not too small, which could restrict frosting flow. Insert your chosen piping tip down into the bag, making sure it fits securely, as illustrated in the image above.
The Easiest Way to Fill Your Piping Bag with Frosting
Once your bag is prepped with the tip, it’s time to add the frosting. The type and consistency of your frosting are vital for successful piping. I always recommend making your own buttercream frosting. Store-bought options often contain excessive sugar and can lack the rich flavor and smooth texture ideal for intricate piping. For a perfect homemade recipe, you can find my full tutorial on how to make luscious buttercream frosting here.
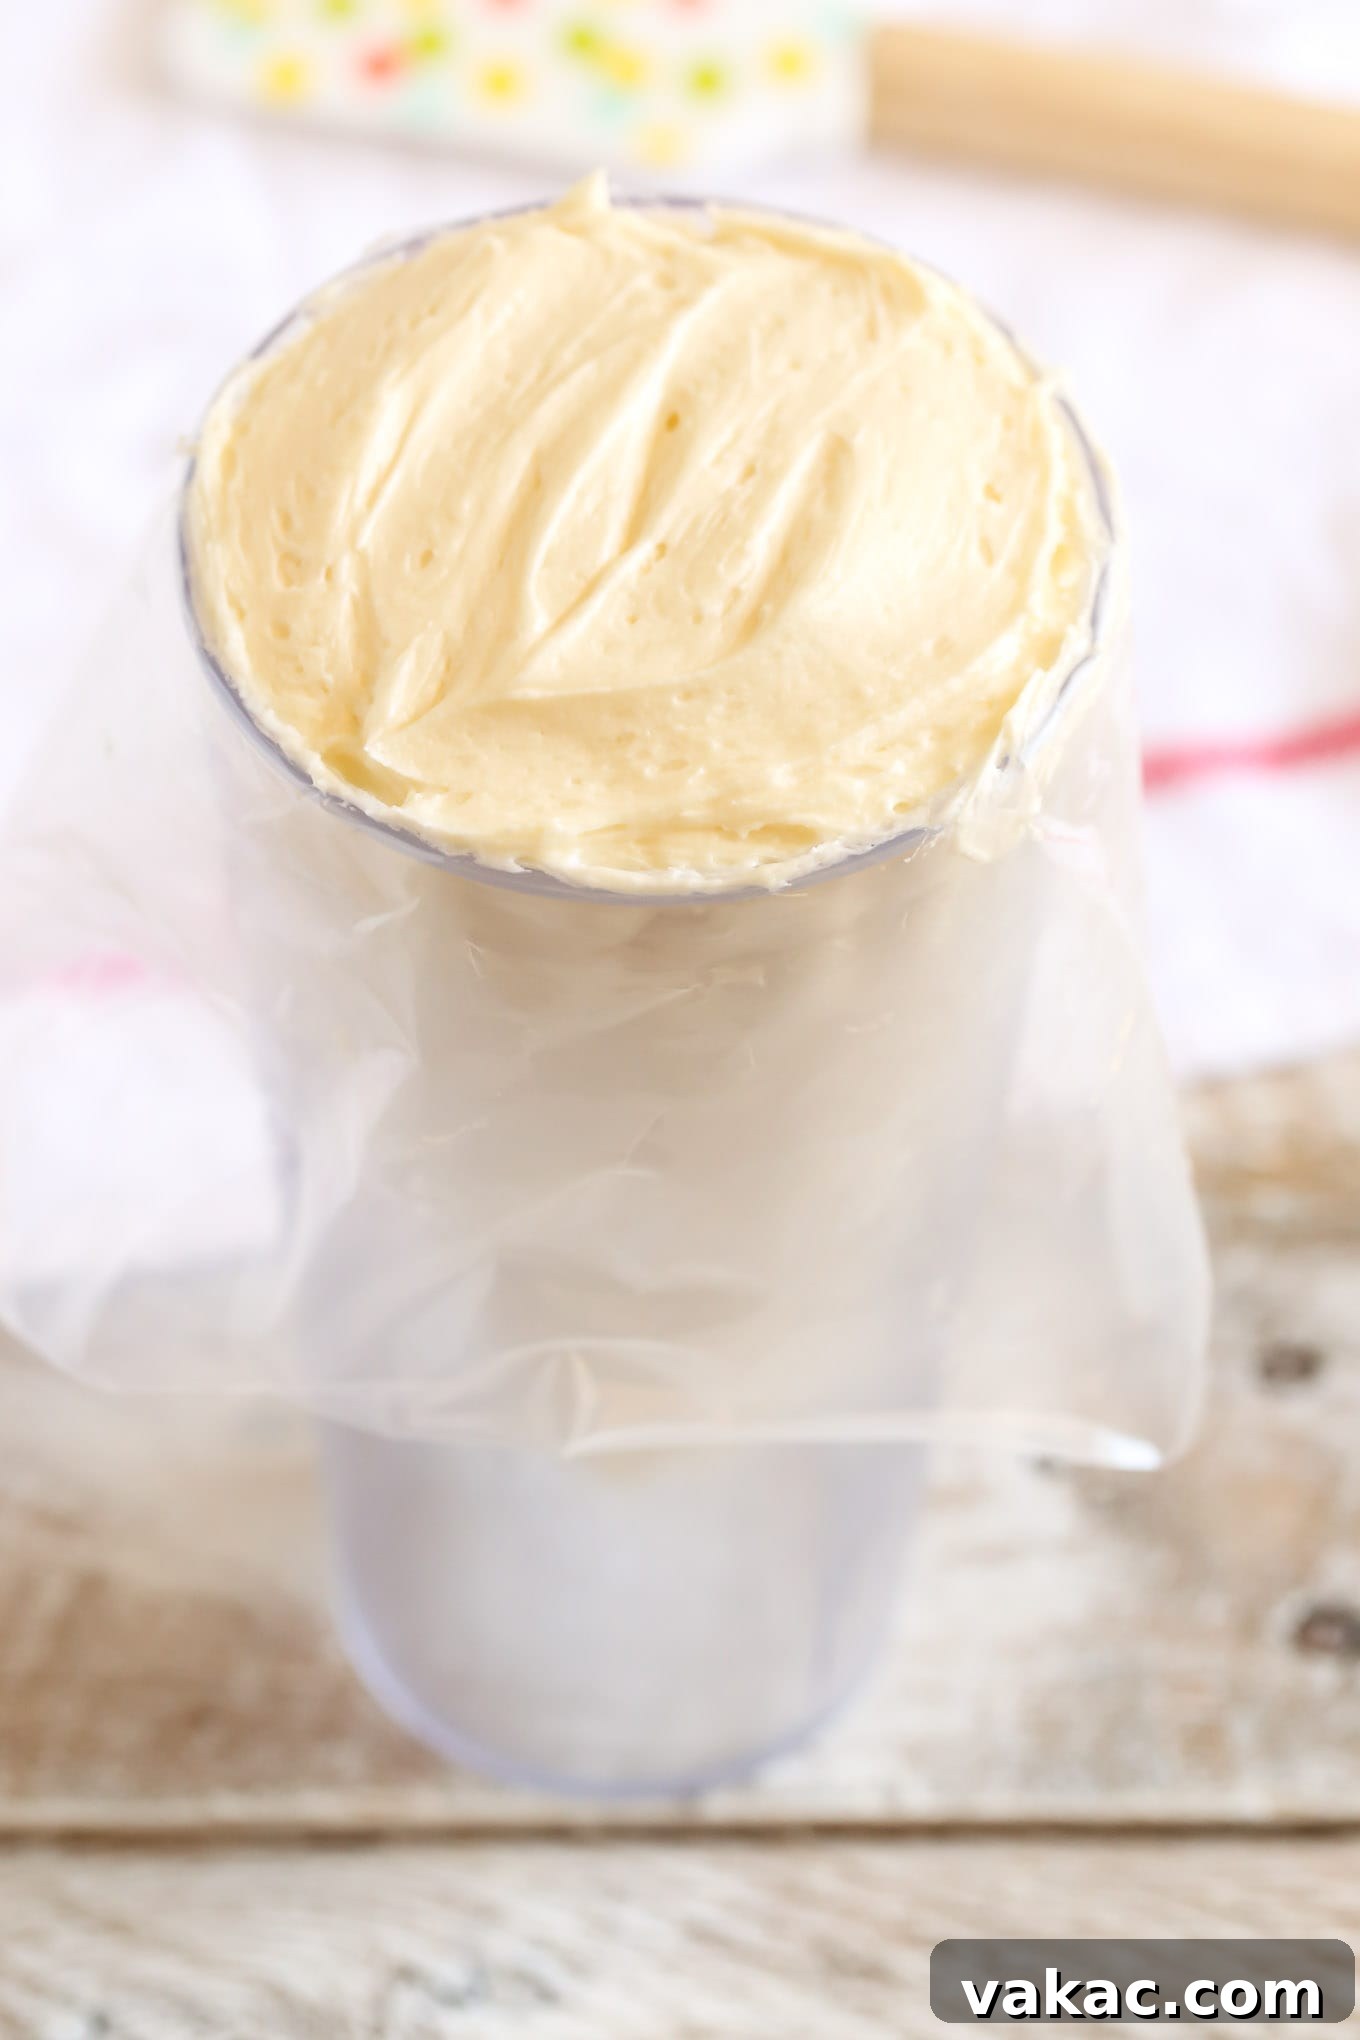
I’ve discovered a brilliant trick that makes filling a piping bag incredibly easy and mess-free. Simply place your piping bag, tip-down, into a large, tall drinking glass or a sturdy measuring cup. Then, fold the edges of the piping bag over the rim of the glass. This creates a wide, stable opening, allowing you to use both hands to spoon your frosting into the bag without any spills or struggles. Once filled to about two-thirds capacity (overfilling makes it harder to control), gently lift the bag out of the cup.
After removing it from the cup, gently squeeze the frosting downwards towards the tip, ensuring there are no large air pockets. Air bubbles can cause inconsistencies and breaks in your piping. Finally, twist the top of the bag tightly, or use a bag tie or rubber band, to seal it. This prevents frosting from spilling out the top as you apply pressure, giving you maximum control and a clean piping experience.
Mastering the Classic Bakery-Style Swirl
Before we embark on creating the perfect swirl, remember this golden rule of piping: maintain constant, even pressure on the bag throughout the entire process. Inconsistent pressure is the most common culprit for shaky lines and uneven frosting. Practice holding the bag firmly with your dominant hand, using your non-dominant hand to guide the tip.
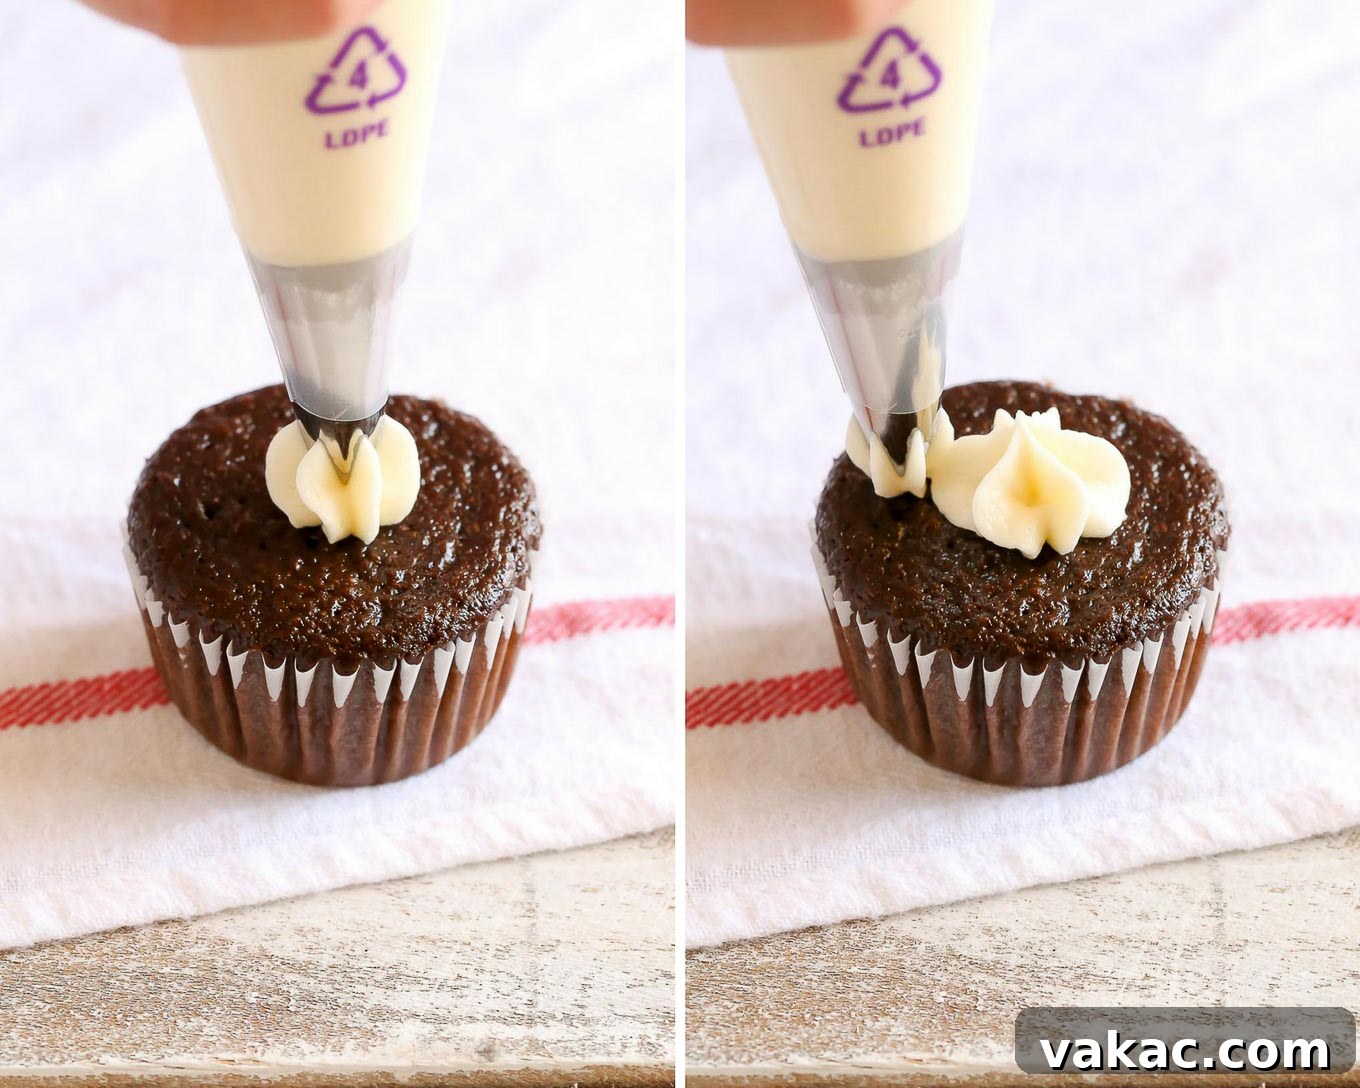
Here’s my simple yet effective trick for achieving a perfectly centered and beautifully structured swirl: Begin by piping a modest dot of frosting directly in the center of your cupcake. This central dot serves as both an anchor and a guide, ensuring your subsequent layers are perfectly aligned. Once this dot is formed, briefly release pressure on the bag to cleanly break contact, then lift and reposition your bag to a point just outside the edge of the dot. I typically prefer to start at the 3 o’clock position (though I’m facing a different way in the photo, find what’s comfortable for you), but feel free to experiment with different starting points to find what feels most natural.
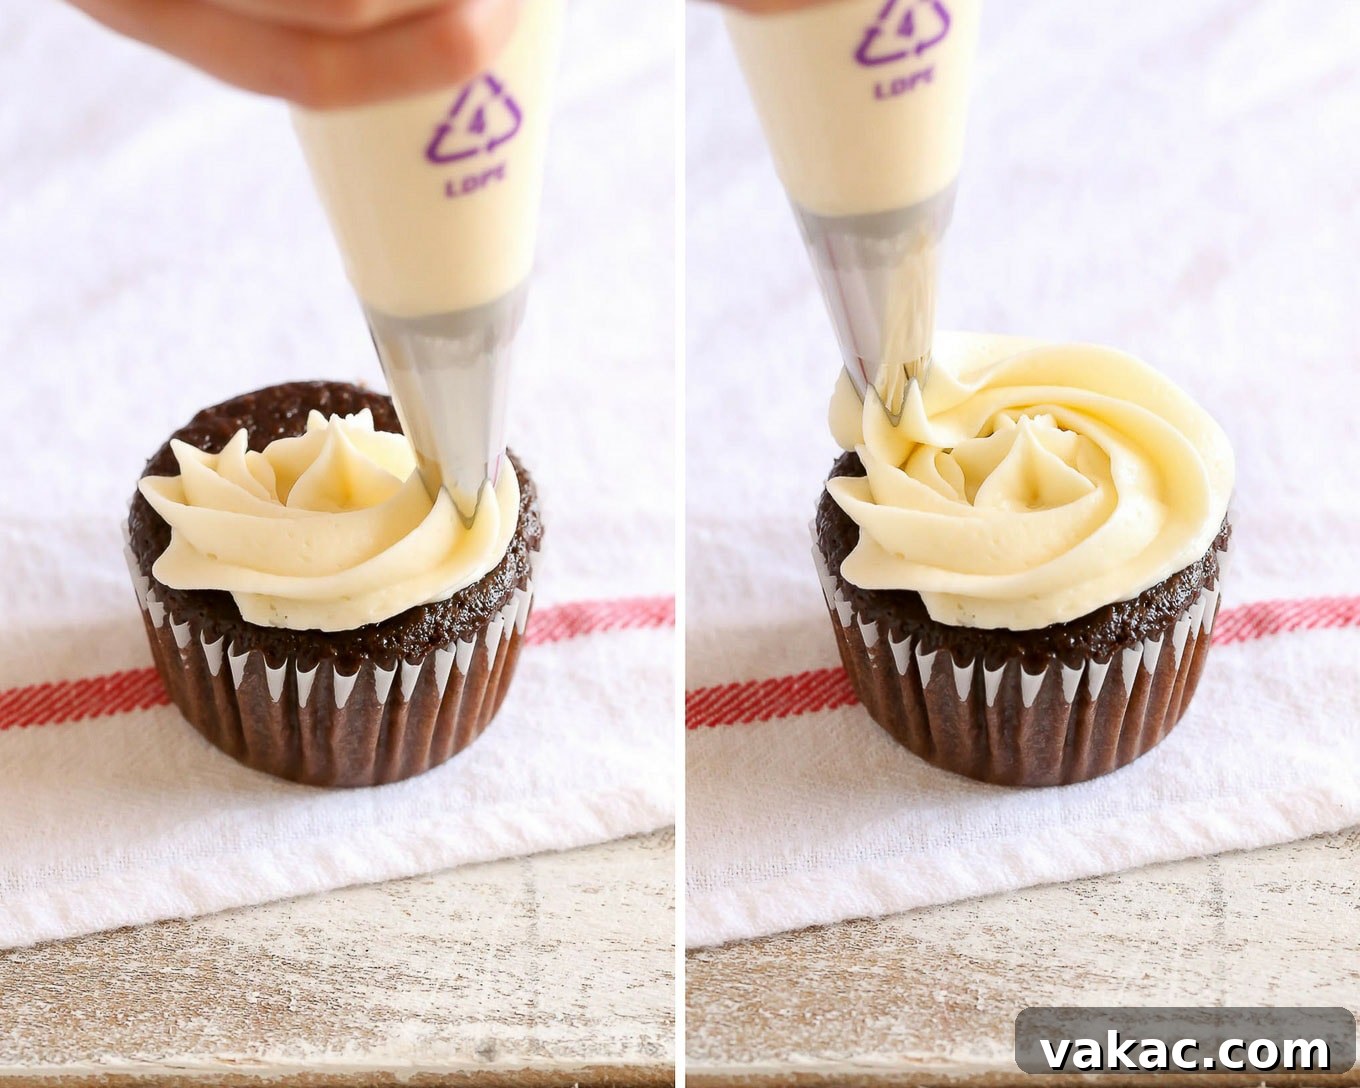
With your bag positioned, reapply even pressure and begin piping a large, continuous circle around the central dot. This first circle should outline the base of your swirl, extending close to the edge of the cupcake. Maintain a consistent height and angle as you pipe, ensuring a smooth and unbroken ring of frosting. Visualize the cupcake as a canvas, and this first circle as the foundation for your masterpiece.
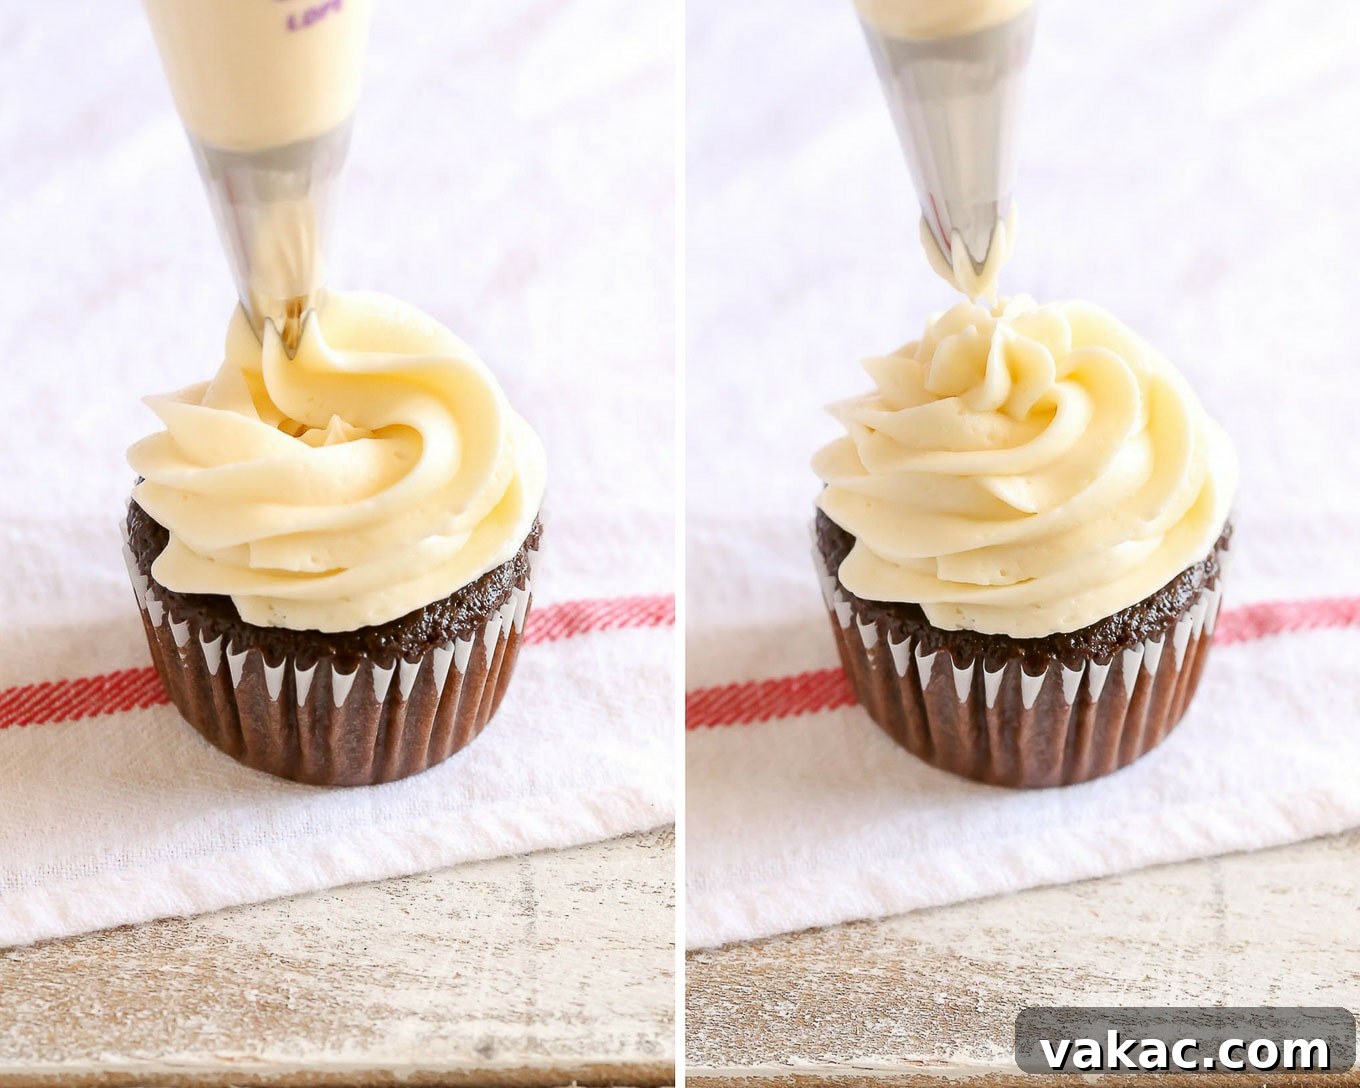
Once you’ve completed the initial outer circle, continue piping, gradually moving inwards and upwards, creating progressively smaller concentric circles on top of the previous layer. This layering technique builds the height and classic conical shape of the bakery-style swirl. As you approach the apex, reduce the diameter of your circles until you reach the very top. To finish cleanly, gently ease the pressure on the bag, subtly press down for a moment to secure the final bit of frosting, and then swiftly lift the bag straight up and away. This prevents any unsightly peaks or tails. This method is incredibly versatile and works beautifully with various piping tips, creating professional-looking results every time.
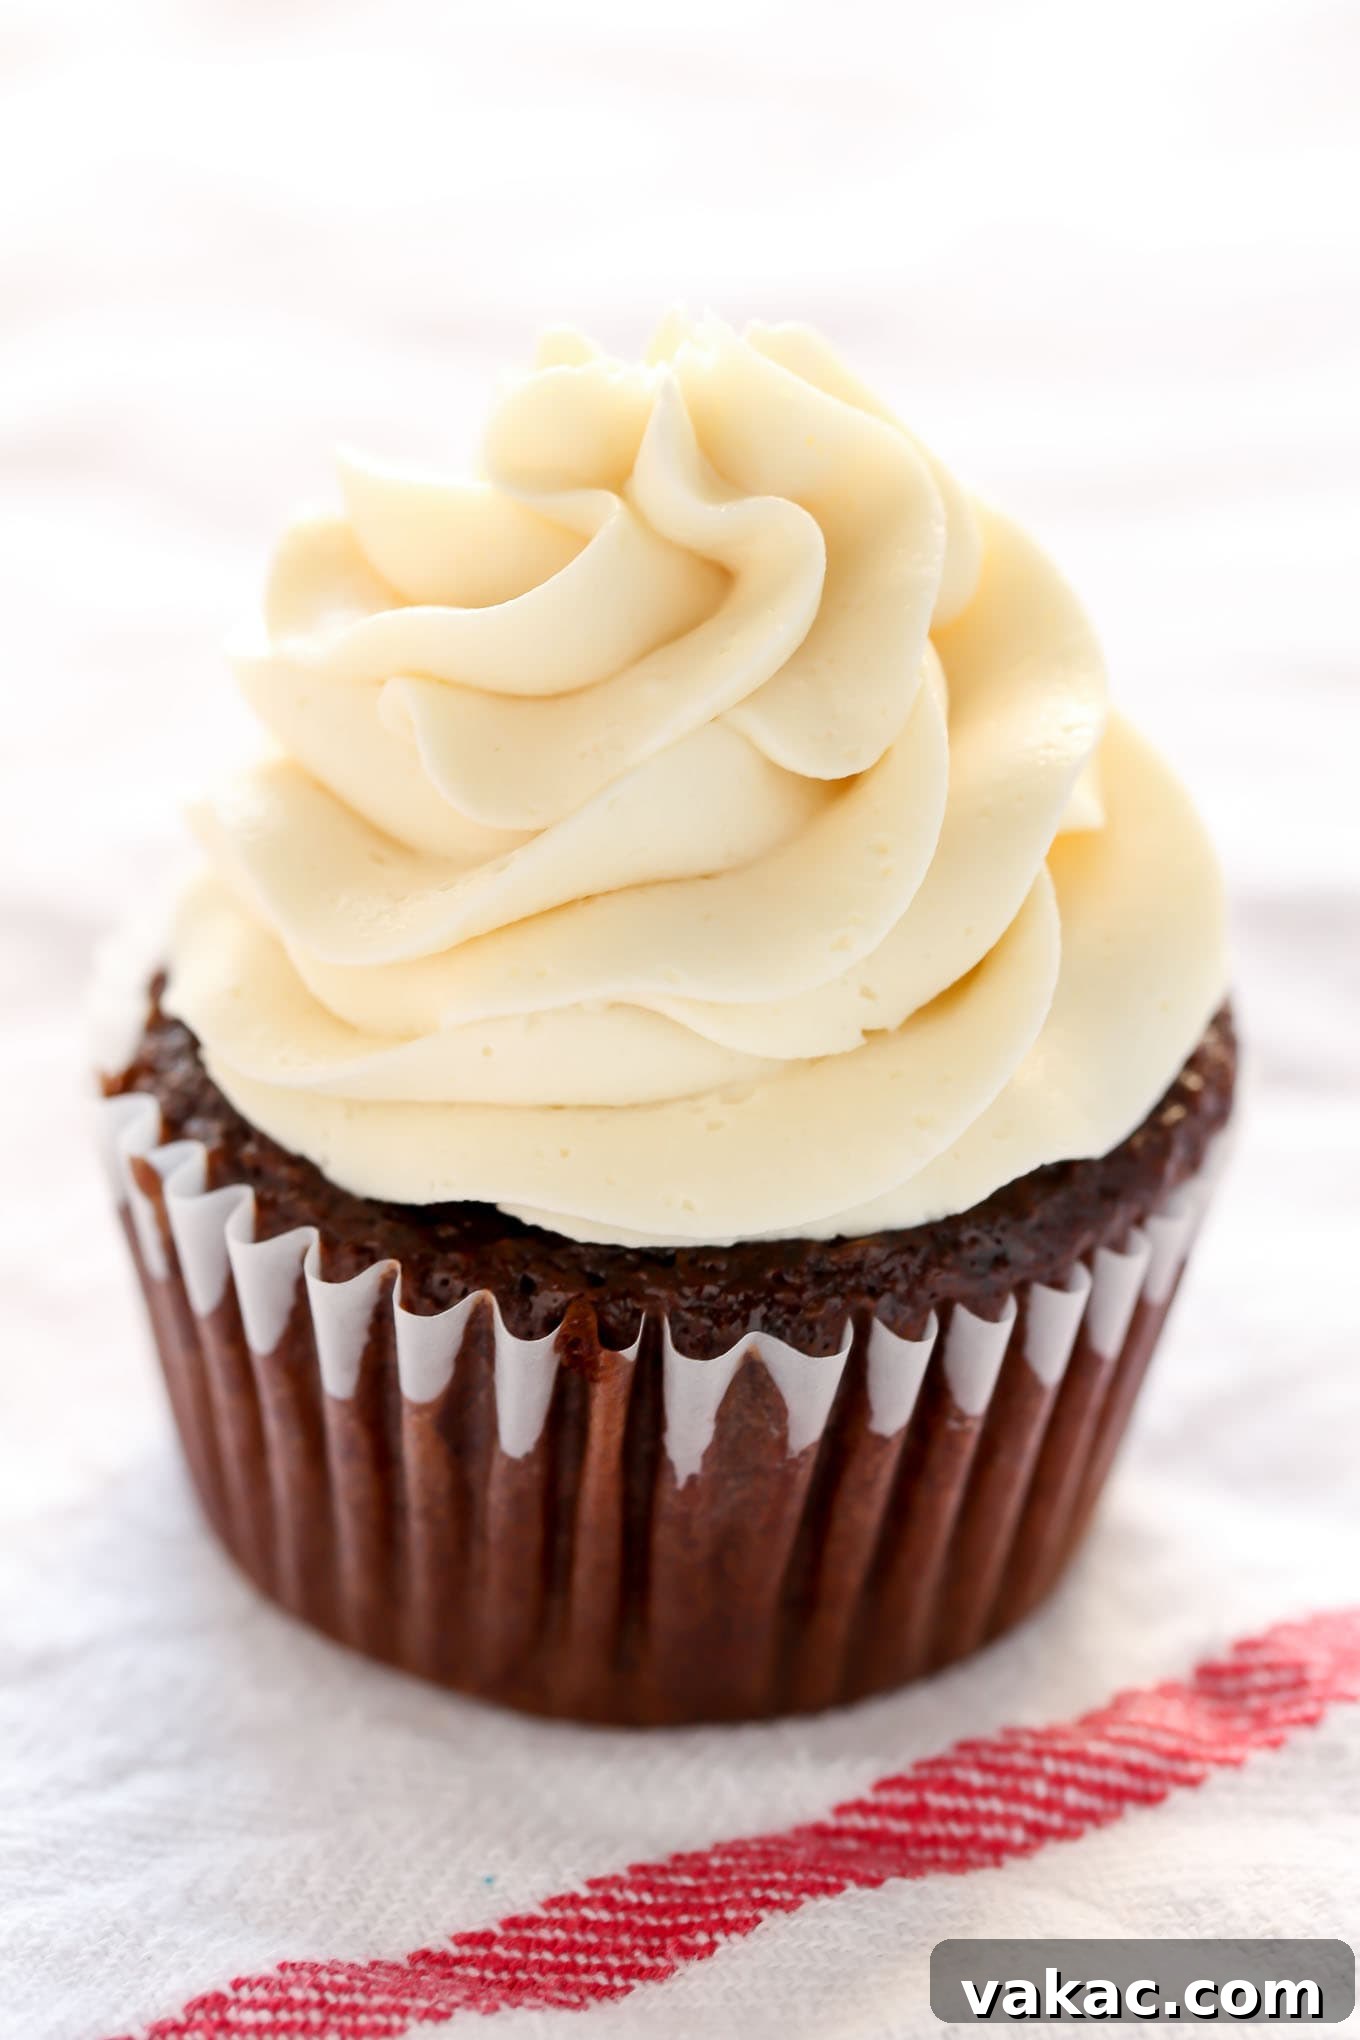
It’s truly that simple to achieve a gorgeous swirl, isn’t it? This technique is remarkably effective with almost any piping tip you choose. The finished product you see above was actually created using the Wilton 2D tip, showcasing its adaptability.
Now, let’s transition to learning how to pipe an exquisite rose onto your cupcakes, a technique that is surprisingly even simpler than the swirl!
Creating an Elegant Buttercream Rose on Your Cupcakes
You might be surprised to learn how effortlessly you can pipe a stunning rose design. In fact, many find this technique even simpler and quicker than the traditional swirl! I’ll be using the same versatile Wilton 1M tip for this demonstration, proving that one good tip can achieve a multitude of beautiful designs.
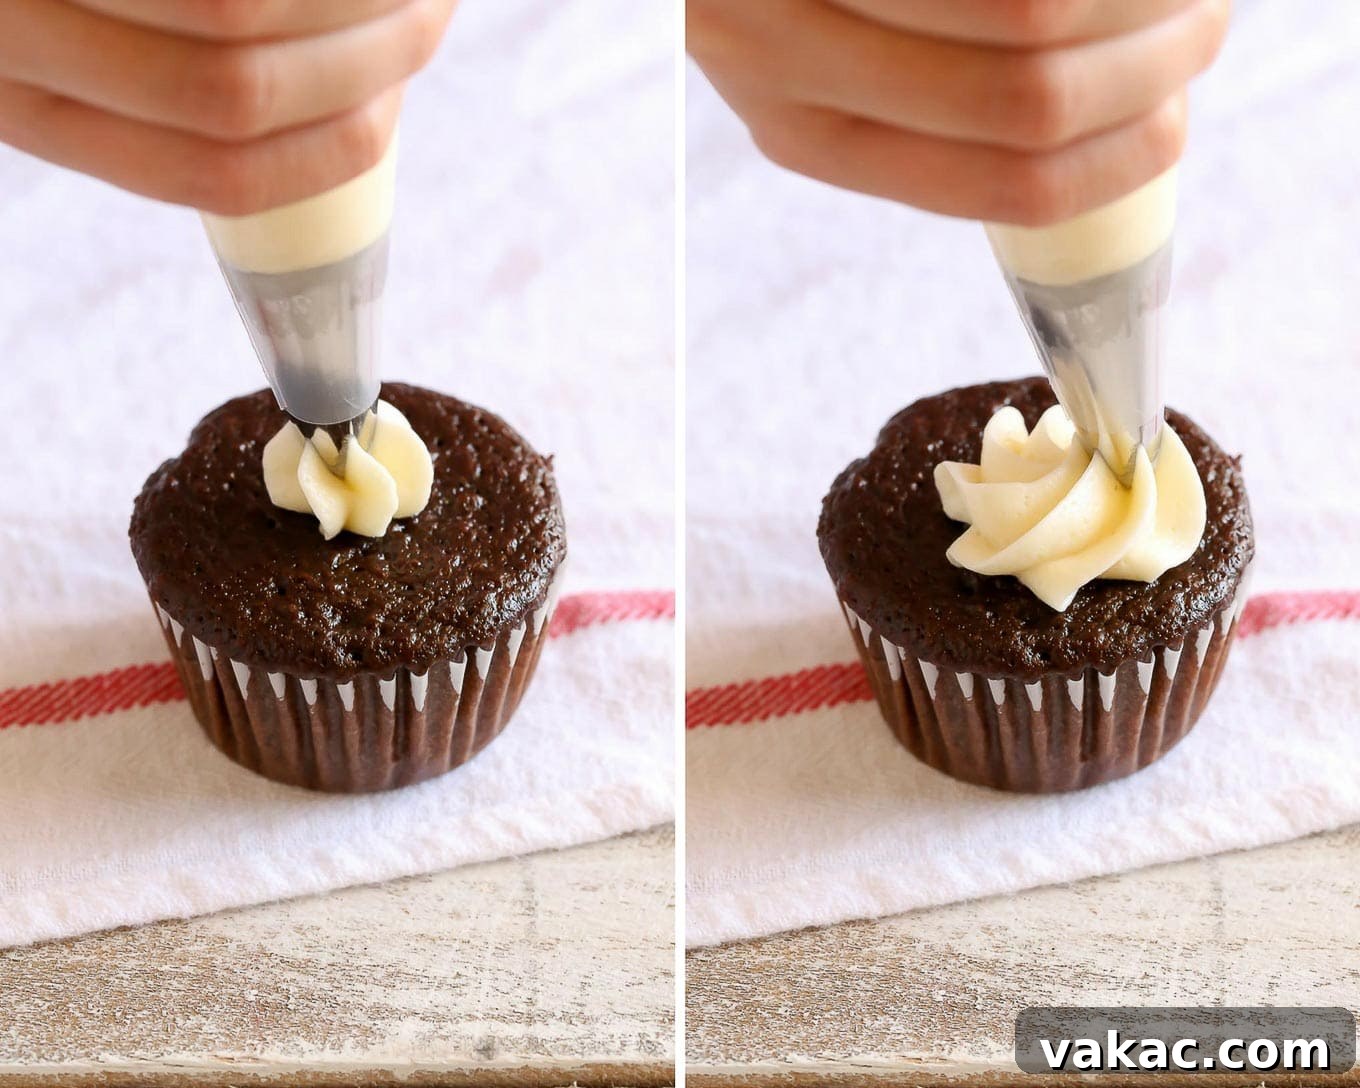
Just like with the swirl, we’ll start by piping a small dot of frosting directly in the center of your cupcake. This forms the very core of your rose. However, unlike the swirl where you momentarily release pressure, for the rose, you will continue applying consistent pressure. Immediately after forming the center dot, smoothly transition into piping continuous, overlapping circles around that central point. Work your way outwards, allowing the frosting to naturally form soft, petal-like layers as you expand the spiral. The key is to maintain a fluid motion, letting each new layer slightly overlap the previous one, building the texture and dimension of a blooming rose.
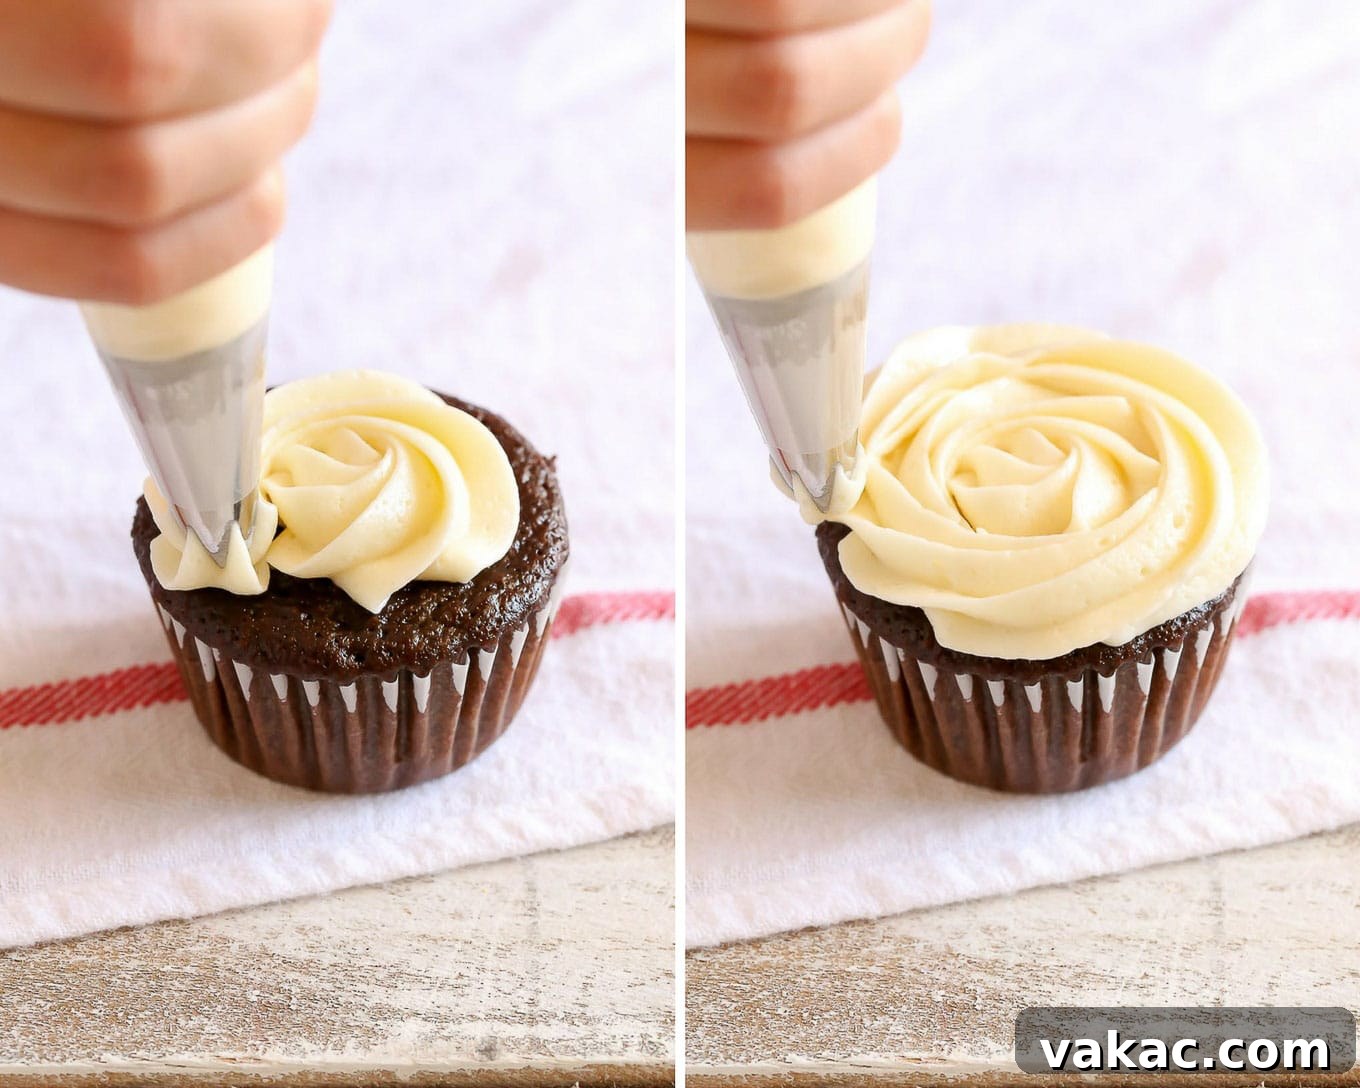
Continue piping these expanding circles, maintaining even pressure and a consistent flow, until you reach the outer edge of the cupcake and the surface is completely covered. Once you’ve filled the entire top of the cupcake with your beautiful rose design, gently release the pressure from the piping bag and lift it straight up and away. This ensures a clean break and preserves the intricate details of your finished rose. The beauty of this technique lies in its organic, free-flowing nature, creating a unique and elegant rose every time.
Even easier than the swirl, wouldn’t you agree?
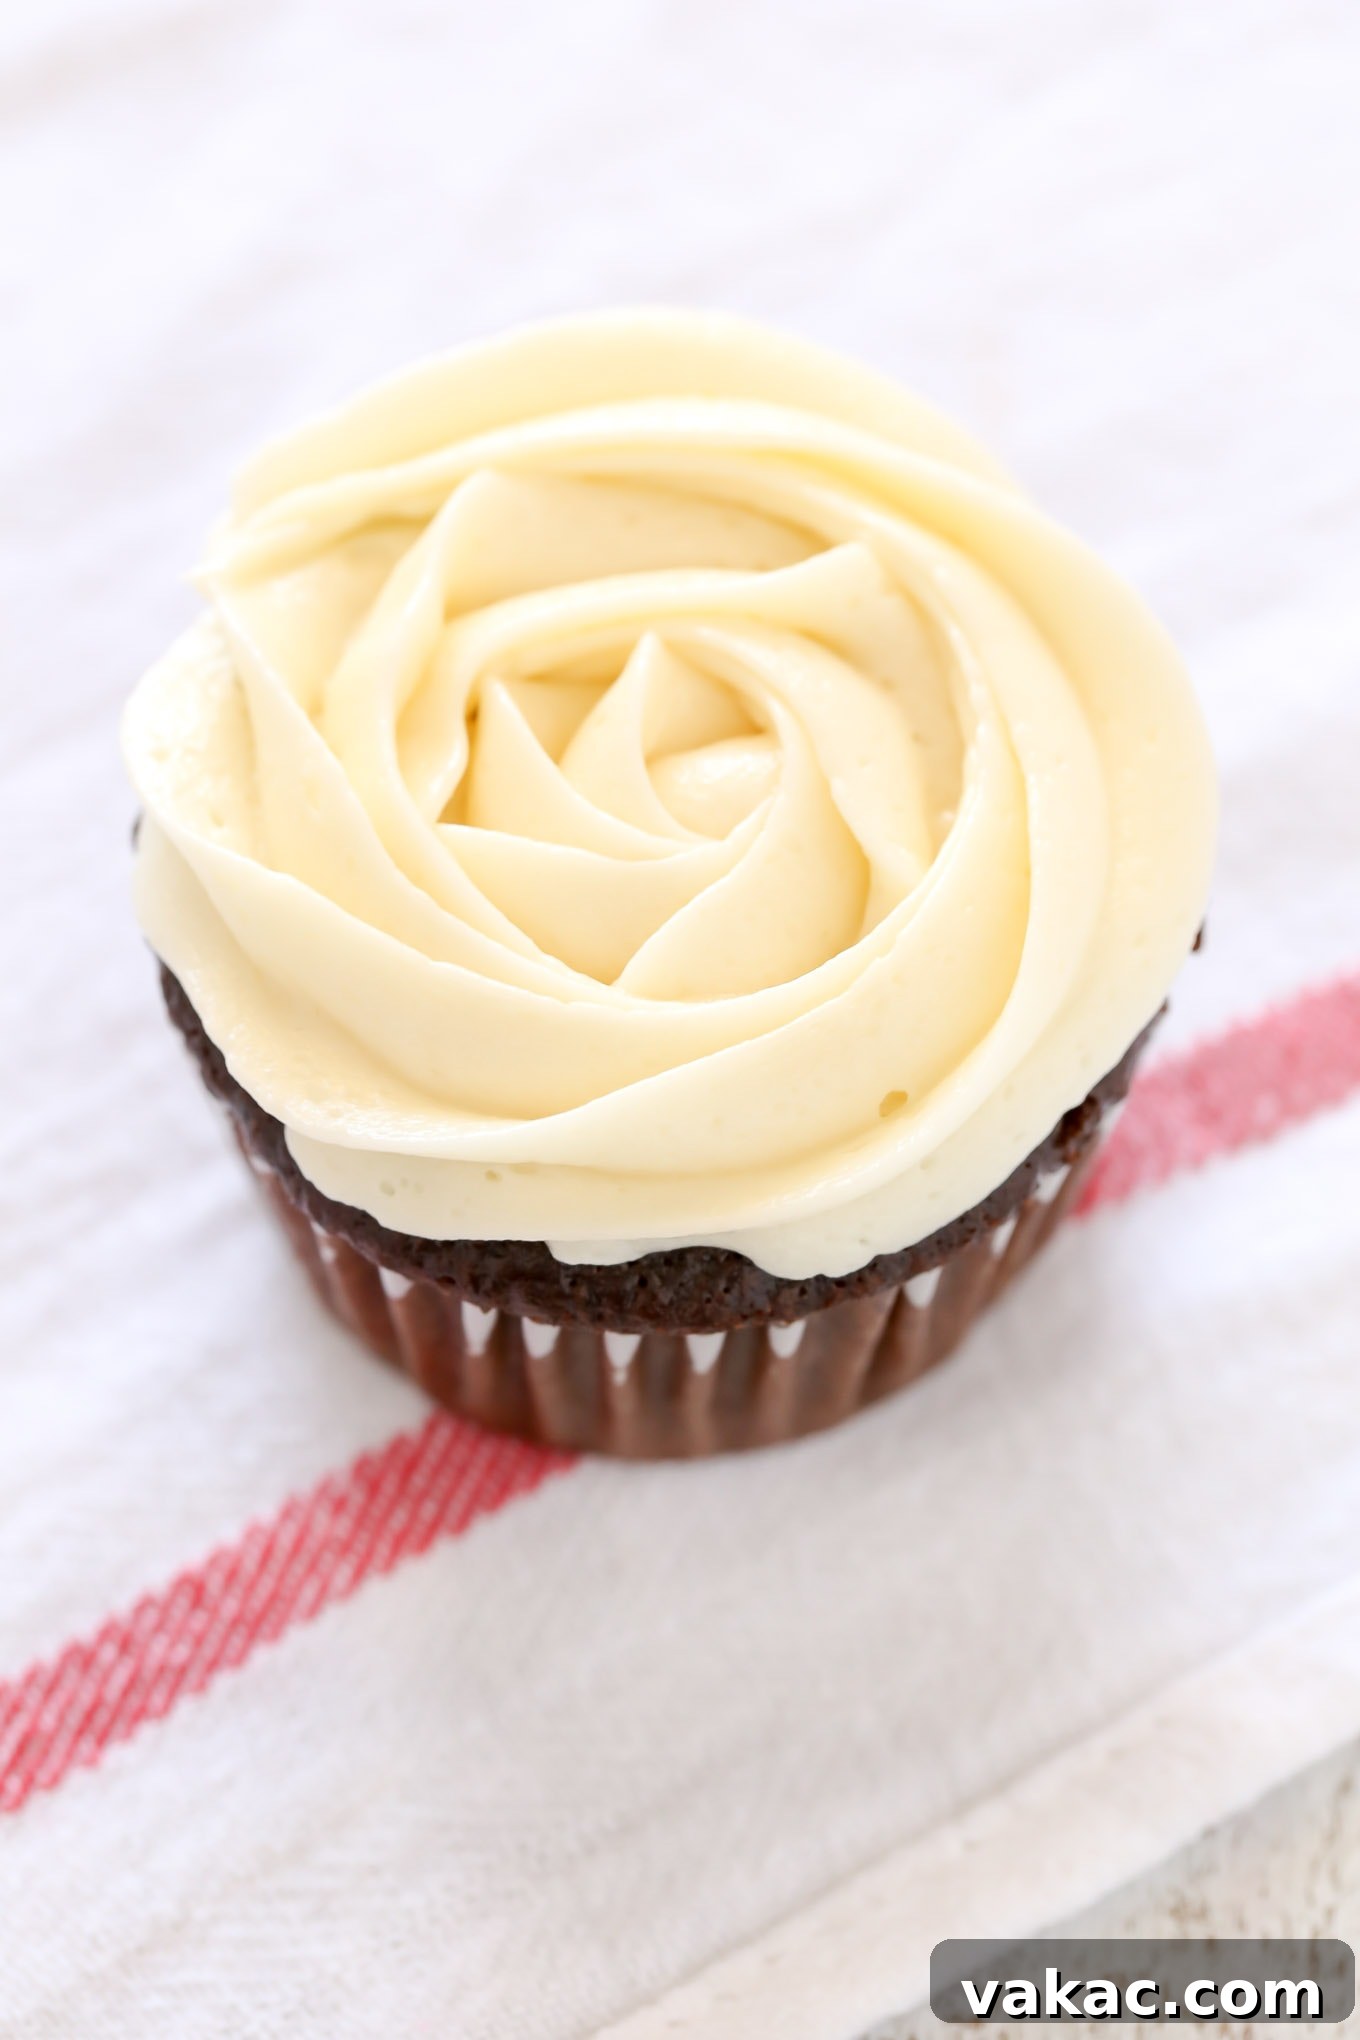
Here’s a closer look at what your exquisite buttercream rose will resemble once completed. To add an extra dimension of creativity, consider incorporating food coloring into your frosting. You can create a spectrum of vibrant hues, or even achieve stunning two-tone effects by painting stripes of gel color inside your piping bag before filling it with frosting. The possibilities for customization are endless!
The Power of Practice: Honing Your Piping Skills
It might sound like a cliché, but when it comes to the intricate art of cupcake decorating, practice truly does make perfect. Don’t feel pressured to get it right on your first try; consistency and confidence come with repetition.
I highly recommend dedicating some time to practice your piping techniques before moving on to your actual cupcakes. A simple piece of parchment paper or even a clean dinner plate makes an excellent practice surface. You can endlessly pipe swirls, roses, or any other design, getting a feel for the pressure, angle, and movement required. Once you feel comfortable and confident with your technique, here’s a brilliant eco-friendly tip: gently scoop the practiced frosting right back into your piping bag! This way, absolutely no delicious buttercream goes to waste. After a little practice, you’ll be amazed at how quickly your hands adapt, and you’ll be ready to transform your cupcakes into works of art.
Delicious Cupcake Recipes to Try
Now that you’re armed with professional piping techniques, you’ll need the perfect canvas! Here are some of my all-time favorite cupcake recipes, offering a delightful variety for every palate:
- Indulgent Chocolate Cupcakes: Rich, moist, and utterly decadent – a classic for a reason!
- Classic Vanilla Cupcakes: The epitome of simple elegance, perfect for showcasing any frosting design.
- Zesty Lemon Cupcakes: Bright, tangy, and refreshing, especially when paired with a fruit-flavored buttercream.
- The Best Carrot Cupcakes: A spiced, flavorful delight (scroll to the bottom of the post for cupcake-specific directions).
- Autumnal Pumpkin Cupcakes: Perfectly spiced and wonderfully moist, a seasonal favorite.
Irresistible Frosting Recipes to Complement Your Creations
The frosting is the crowning glory of any cupcake! As mentioned, homemade is always best for flavor and piping consistency. Here again is my comprehensive full tutorial for making your own luscious buttercream frosting. That post also includes detailed instructions for transforming basic buttercream into delightful vanilla, strawberry, chocolate, or caramel variations. But don’t stop there! Here are a few other fantastic frosting recipes to broaden your decorating horizons:
- Velvety Cream Cheese Frosting: A timeless pairing for red velvet or carrot cakes.
- Dreamy Peanut Butter Frosting: A rich, nutty topping that’s incredibly satisfying.
- Vibrant Raspberry Frosting: Fruity and fresh, a beautiful complement to lemon or vanilla cupcakes.
I genuinely hope this detailed tutorial empowers you to feel more confident and excited about decorating your cupcakes. Remember, every baker, no matter how experienced, started somewhere. If I could overcome my initial struggles and learn to frost cupcakes like a pro, I have absolute faith that you can too. Don’t hesitate to experiment, have fun, and most importantly, enjoy the delicious process! If any questions arise during your decorating journey, please feel free to leave them in the comments section below – I’m here to help!