

Learn how to make delicious, soft, light, and tender scones with this easy tutorial. This scone recipe is perfect for breakfast, brunch, or dessert!

Scones often endure an unfair reputation, frequently dismissed as dry, crumbly, or bland baked goods. However, this common misconception couldn’t be further from the truth. A truly exceptional scone, when prepared correctly, is an absolute revelation – incredibly soft, beautifully light, and so wonderfully tender that it practically dissolves in your mouth. They possess a delicate crumb and a rich, buttery flavor that makes them a versatile and cherished treat, perfectly suited for a leisurely breakfast, an elegant brunch spread, or a delightful afternoon dessert. If your past experiences with scones have left you unimpressed, prepare to embark on a culinary journey that will transform your perceptions with this definitive guide to baking the best homemade scones you’ve ever tasted.
Unlock the Secret to Baking Fluffy & Tender Homemade Scones
This comprehensive tutorial aims to demystify the art of scone baking, guiding you through the essential techniques required to create exquisite scones from scratch. You’ll be pleasantly surprised at how effortlessly these treats come together; the active preparation time is remarkably short, approximately 15 minutes, followed by a mere 20 minutes of baking in the oven. This efficiency means you can enjoy a batch of warm, fragrant, fresh-baked scones in well under an hour from the moment you start mixing. Imagine the delight of serving these warm, golden delights to family and friends, or simply savoring one with your morning coffee.
Beyond mastering the classic plain scone, this recipe serves as a versatile and robust foundation for an almost endless array of flavor combinations. We’ll delve into exciting and delicious variations, from vibrant fruity infusions to comforting, warming spices, ensuring you can tailor your scones to perfectly match any preference, season, or special occasion. And because no scone is truly complete without a complementary topping, we’ve also included several luscious glaze options. These glazes will add that extra touch of elegance and flavor, allowing you to truly personalize this recipe and make it your signature bake.
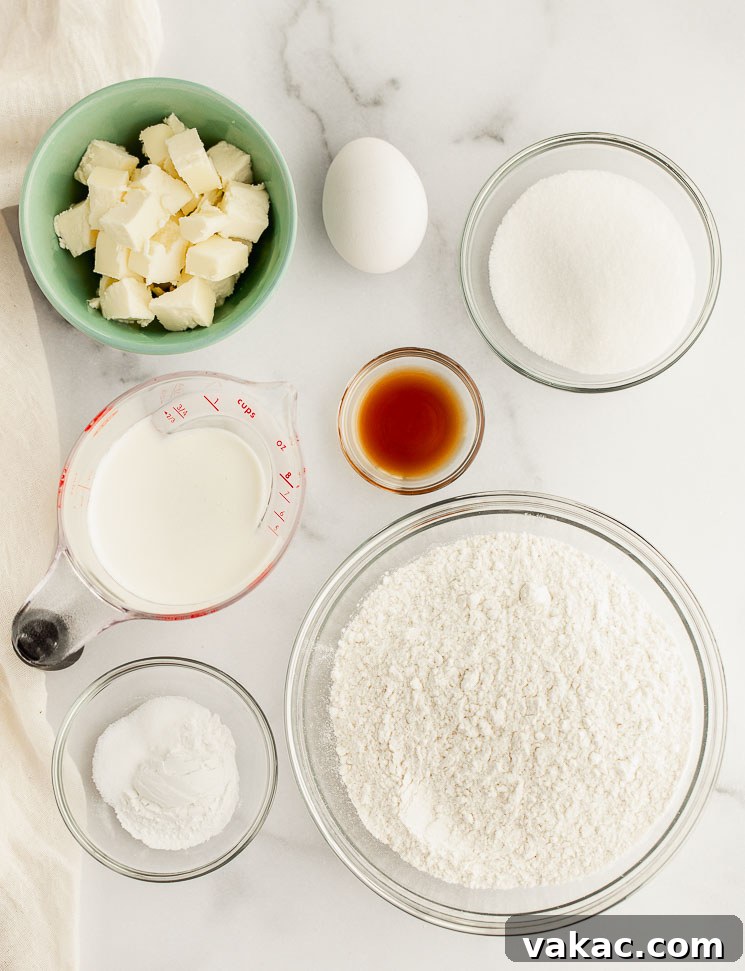
The Essential Ingredients for Achieving Perfect Scones
Crafting truly magnificent scones doesn’t necessitate an exotic or extensive list of pantry items. In fact, you’ll likely find most of these fundamental ingredients already gracing your kitchen shelves. The real secret to success lies not just in having the ingredients, but in understanding the precise role each plays in the baking process and ensuring they are prepared and handled correctly. Let’s break down the details of what you’ll need for this tried-and-true scone recipe, and why each component is crucial:
- All-Purpose Flour: This forms the structural backbone of our scones. The method of measuring your flour is incredibly important for achieving the desired light and tender texture. Always opt for the “spoon and level” method: gently spoon the flour into your dry measuring cup until it overflows, then level off the excess with the back of a straight edge or knife. Avoid scooping flour directly from the bag with the measuring cup or packing it down, as this can add significantly more flour than intended, leading to a dense, dry, and crumbly dough—the exact opposite of the tender crumb we’re aiming for. Too much flour will absorb excessive moisture, preventing the scones from developing that coveted airy and tender quality.
- Granulated Sugar: Beyond simply providing sweetness, granulated sugar plays a vital role in contributing to the tenderness of the scones. It does this by interfering with the development of gluten, which in turn helps create a softer, more delicate texture. For this particular recipe, granulated sugar is my preferred choice, as it yields a subtle and delicate sweetness that allows other nuanced flavors, especially from any added variations, to truly shine. However, if you’re inclined towards a richer, deeper, and slightly molasses-like note, light brown sugar can be a wonderful and effective substitute.
- Baking Powder & Salt: These two ingredients are the unsung heroes responsible for the impressive lift and balanced flavor of your scones. You might notice a seemingly generous quantity – a full tablespoon – of baking powder in this recipe. Rest assured, this is not a mistake! This substantial amount is absolutely essential for imparting the scones with their characteristic lofty rise and wonderfully airy, open crumb structure, effectively preventing them from becoming disappointingly flat or dense. Salt, on the other hand, performs a crucial function beyond mere seasoning; it adeptly balances the sweetness of the sugar and significantly enhances the overall flavor profile of the scones, ensuring they are not just sweet, but truly flavorful and delicious.
- Cold Unsalted Butter: Without a doubt, this is arguably the single most critical ingredient for achieving truly flaky, tender, and perfectly risen scones. The “cold” aspect is absolutely non-negotiable. As the tiny, distinct pieces of cold butter are introduced into the dry ingredients and subsequently melt during the baking process, they release bursts of steam. These microscopic steam pockets are what create those incredible layers and pockets of air within the dough, ultimately giving scones their spectacular rise and a wonderfully light, almost ethereal, flaky interior. Opting for unsalted butter is also important as it allows for precise control over the overall salt content in your recipe, given that the amount of salt in various brands of salted butter can fluctuate quite significantly. Always make sure your butter is cubed into small pieces and kept thoroughly chilled in the refrigerator or even freezer until the very moment you are ready to incorporate it into your dry ingredients.
- Heavy Whipping Cream: When the goal is to produce scones that are sumptuously soft and moist, consistently resisting any tendency to dry out, heavy whipping cream stands out as the superior choice over lighter milk alternatives. Its significantly higher fat content actively contributes to a richer flavor profile and a noticeably more tender crumb structure. Furthermore, a light, even brush of heavy cream applied to the tops of the scones just before they enter the oven performs a magical transformation: it helps to create a beautiful, enticing golden-brown crust that is subtly crisp on the outside, providing a lovely textural contrast while keeping the interior supremely tender.
- Egg & Vanilla Extract: The thoughtful inclusion of a large egg in this recipe adds both structure and richness, further contributing to a lighter and even more tender texture in the final baked scone. It also serves as an effective binding agent, helping to bring the dough together cohesively. Pure vanilla extract, as always, contributes a classic, warm, and universally appealing aroma and flavor that perfectly complements the delicate sweetness of the scone, adding a layer of sophisticated depth without overpowering the other ingredients.
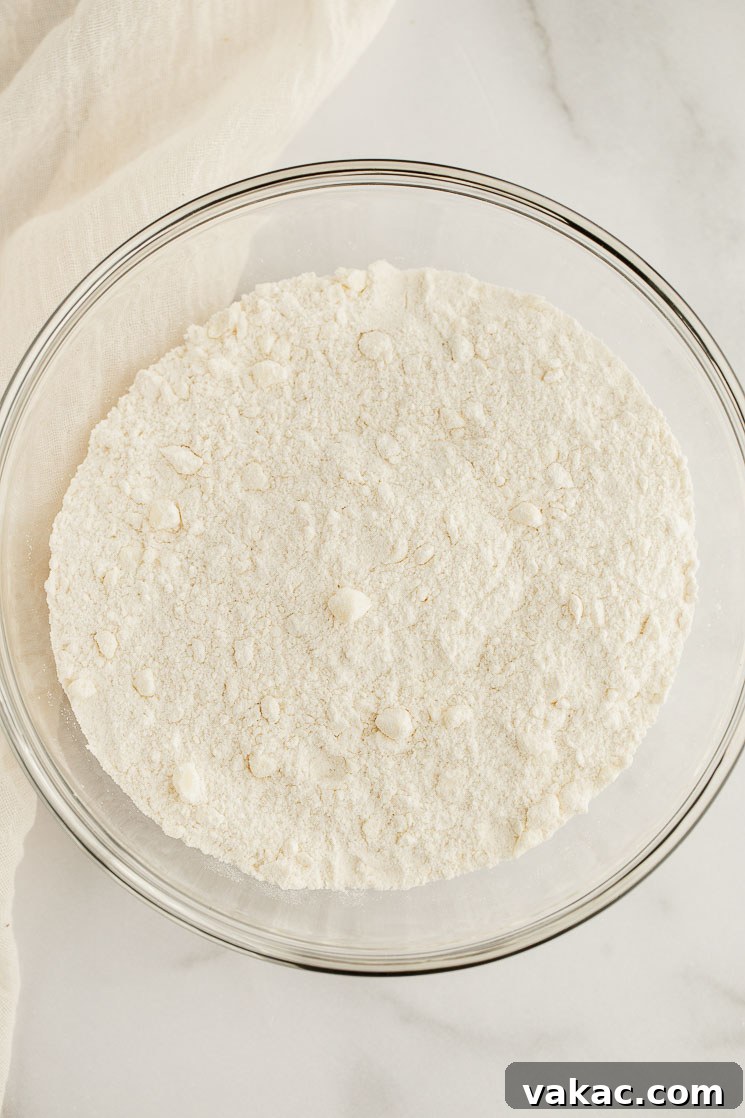
Your Step-by-Step Guide to Baking Irresistible Scones
Baking truly incredible scones is a far simpler endeavor than many might assume. The process is remarkably straightforward, demanding minimal fuss and consistently delivering maximum reward in the form of delicious, homemade treats. By following these steps carefully and paying close attention to the subtle but important details, you’ll be enjoying warm, fragrant scones in practically no time at all. Let’s get baking!
- Prepare Your Workspace and Oven: Start by preheating your oven to a precise 400°F (204°C). Ensuring your oven is at the correct temperature when the scones are ready to bake is absolutely critical for achieving that desirable, uniform rise. Next, line a large baking sheet with either parchment paper or a silicone baking mat. This crucial step prevents the scones from sticking to the pan and promotes even browning across their bottoms. Set this prepared baking sheet aside.
- Combine Dry Ingredients: In a generously sized mixing bowl, thoroughly whisk together the precisely measured all-purpose flour, granulated sugar, baking powder, and salt. Whisking vigorously ensures that all the leavening agents and flavorings are perfectly and evenly distributed throughout the flour mixture, which is a vital prerequisite for consistent texture and an impressive, uniform rise in every scone.
- Incorporate the Cold Butter: Retrieve your pre-cubed, thoroughly chilled unsalted butter and add it directly into the bowl with the dry ingredients. Now, using a pastry cutter, two forks, or even your fingertips (if you work very quickly to minimize warming the butter), begin to cut the butter into the flour mixture. Continue this process until the mixture visually resembles coarse meal, with distinct, small, pea-sized crumbs of butter still clearly visible throughout. These small, cold butter pieces are the secret to achieving that coveted flaky interior. It is paramount to avoid overworking the butter into the flour, as excessive manipulation will lead to over-developing the gluten, resulting in tough, rather than tender, scones.
- Mix Wet Ingredients: In a separate, smaller mixing bowl, thoroughly whisk together the heavy whipping cream, the large egg, and the pure vanilla extract until all three components are fully combined and uniform in consistency.
- Combine Wet and Dry: Pour the entire wet ingredient mixture into the larger bowl containing the dry ingredients and the butter mixture. Using a rubber spatula or a sturdy wooden spoon, gently stir the mixture together until it just comes together into a cohesive dough. The cardinal rule here is: do not overmix! Overmixing is the most common culprit behind tough scones, as it over-develops the gluten. At this stage, the dough should still appear a little crumbly and slightly shaggy; an ideal scone dough is typically on the drier side.
- Shape and Cut the Dough: Carefully scoop the slightly crumbly dough out onto a lightly floured surface. With a light touch, gently bring the dough together with your hands, forming it into a cohesive ball. Resist the urge to knead aggressively. Once formed, gently flatten the ball into a disc approximately 7 inches in diameter and about 1 inch thick. Using a sharp knife or a round cookie cutter, cut the disc into 8 equal-sized wedges or rounds. When cutting, always press straight down and lift the cutter or knife; absolutely avoid any twisting motion, as twisting can seal the edges of the dough and inhibit a full, even rise during baking.
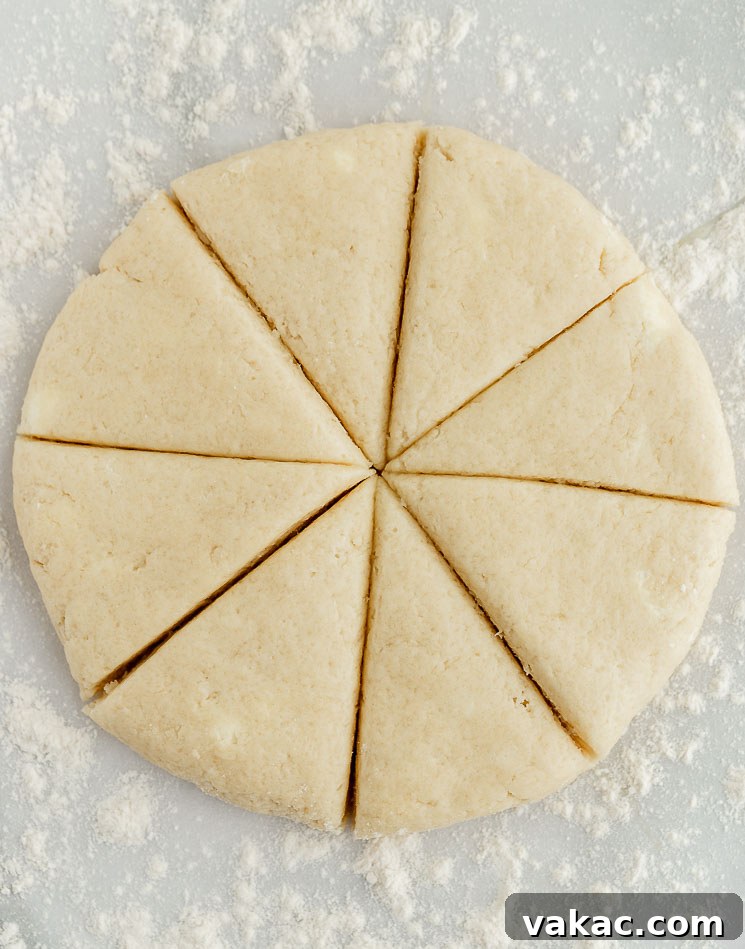
- Chill the Scones: With care, transfer the individually cut scone pieces onto your previously prepared baking sheet, ensuring you leave a small amount of space between each scone to allow for expansion. This step is absolutely crucial: place the entire baking sheet, complete with the scones, into the freezer for a duration of 5-10 minutes, or until the scone dough is thoroughly chilled to the touch. This rapid chill helps to re-solidify the butter bits within the dough, which in turn guarantees maximum steam production and an excellent, lofty rise once they enter the hot oven. Do not skip this vital step!
- Prepare for Baking: Once adequately chilled, remove the baking sheet from the freezer. Lightly and evenly brush the tops of each scone with a little extra heavy whipping cream. This simple cream wash will contribute significantly to developing a beautiful, enticing golden-brown color and a subtly crisp exterior during baking. If you intend to serve your scones plain or without any glaze, this is the perfect opportunity to sprinkle them with a delicate touch of coarse sugar or granulated sugar for an appealing extra texture and a beautiful sparkle.
- Bake to Golden Perfection: Carefully place the prepared baking sheet into your preheated oven and allow the scones to bake for approximately 18-22 minutes. It’s important to note that baking times can vary slightly depending on the calibration of your specific oven, so keep a watchful eye on them. The scones are perfectly ready when their tops have achieved a gorgeous golden-brown hue and a skewer or toothpick inserted into the center of one comes out completely clean, indicating they are fully cooked through.
- Cool and Serve: Once baked to perfection, promptly remove the scones from the oven and carefully transfer them to a wire cooling rack. Allow them to cool completely before you apply any glaze or proceed to serve them. While the temptation to enjoy them piping hot is strong, allowing them to cool adequately permits the internal structure to fully set, ensuring the best possible texture and crumb.
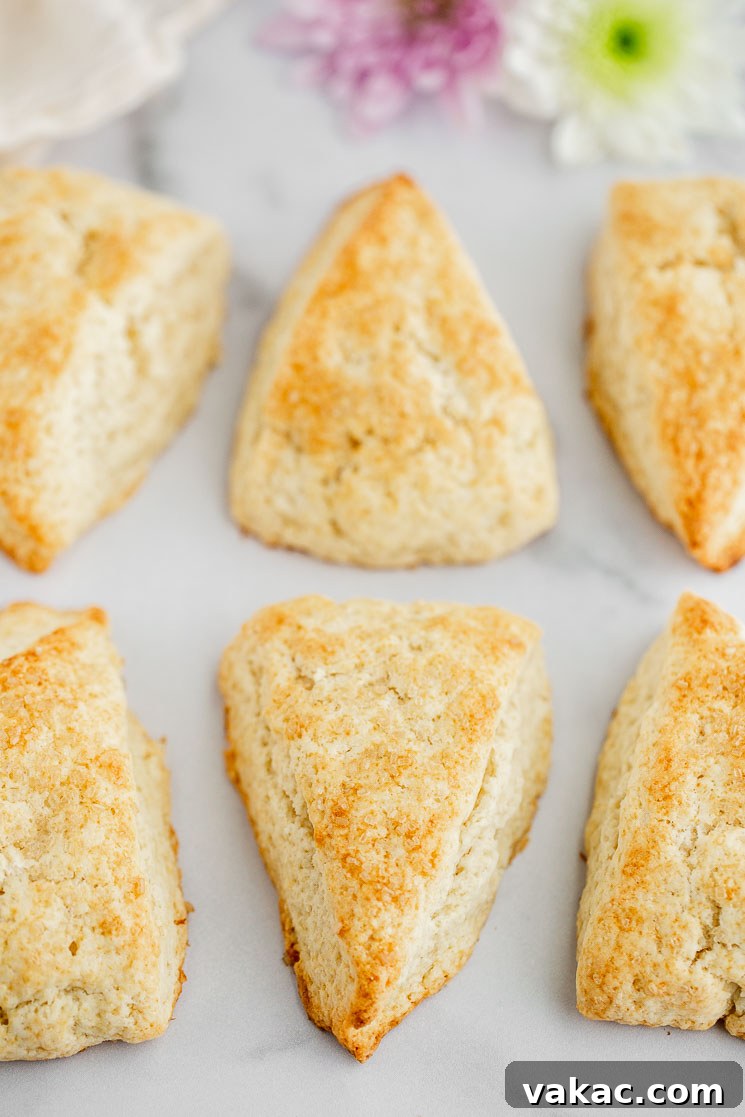
Creative Scone & Glaze Variations to Elevate Your Baking
One of the most exciting and rewarding aspects of mastering this basic scone recipe is its incredible versatility. It provides a wonderfully neutral yet rich canvas for an almost endless array of flavor combinations, allowing your culinary creativity to truly flourish. Feel completely free to experiment and unleash your imagination! When you decide to add solid mix-ins, the optimal time to incorporate them is immediately after you’ve cut in the cold butter and just before you add the wet ingredients. This ensures that your chosen additions are evenly distributed throughout the dough without the risk of overworking it.
Delectable Scone Flavor Combinations:
- Blueberry Bliss: For a burst of natural sweetness and moisture, gently fold in 1 cup (150 grams) of fresh blueberries into the scone dough. The slight tartness of the berries provides a delightful counterpoint to the scone’s richness. For an extra layer of brightness, a subtle hint of fresh lemon zest pairs exquisitely with blueberries.
- Vibrant Cranberry Orange: Introduce a lively tang and complementary sweetness by adding 2 teaspoons of freshly grated orange zest along with 2/3 cup (105 grams) of sweetened dried cranberries. If you prefer a more pronounced tartness and happen to have fresh cranberries on hand, 1 cup of chopped fresh cranberries would also be a fantastic, seasonal addition.
- Comforting Cinnamon Raisin: For a truly comforting and classic flavor profile, mix in 1 ½ teaspoons of aromatic ground cinnamon and 2/3 cup (105 grams) of plump, juicy raisins. This timeless combination evokes the cozy warmth of autumn mornings and pairs absolutely perfectly with a steaming cup of hot tea or coffee.
- Zesty Lemon Poppy Seed: Brighten your scones with an invigorating, fragrant citrus note by adding the zest of 1 medium lemon and ½ tablespoon of delicate poppy seeds. The lemon provides a wonderful aromatic lift, while the poppy seeds contribute a subtle, pleasant crunch and an attractive visual appeal to each scone.
- Indulgent Chocolate Chip: For all the chocolate aficionados, stir in ¾ to 1 cup of your preferred chocolate chips – whether dark, milk, or white chocolate. The delightful pockets of melting chocolate create moments of pure indulgence. For more specialized tips and guidance on crafting these, you can also explore my dedicated chocolate chip scone recipe here.
- Spiced Apple Cinnamon: A truly quintessential autumnal treat, finely dice and peel 1 cup of apples (varieties like Granny Smith or Fuji work wonderfully for their texture and tartness), then combine them with 1 teaspoon of ground cinnamon and a delicate pinch of nutmeg. You can discover more detailed instructions and tips for this variation in my apple cinnamon scones recipe here.

Decadent Glaze Options:
While a perfectly baked scone is a joy in itself, a simple yet elegant glaze can truly elevate your creation from delicious to absolutely irresistible. Our base vanilla glaze is wonderfully versatile, but don’t feel limited! By simply changing one or two ingredients, you can effortlessly craft an entirely new and exciting flavor experience.
- Zesty Orange Glaze: For a bright, exhilarating citrus finish, simply omit the vanilla extract from the basic glaze recipe and substitute fresh orange juice in place of the milk. This vibrant glaze pairs beautifully with plain scones or those infused with cranberry-orange variations.
- Tangy Lemon Glaze: Following a similar principle to the orange glaze, swap out the vanilla extract for fresh lemon juice in lieu of milk. The refreshing tang of lemon provides a wonderful, zesty contrast to the scone’s inherent sweetness and is particularly excellent when paired with blueberry or classic plain scones.
- Spiced Cinnamon Glaze: Infuse your glaze with a comforting, warm aroma and flavor by incorporating ¼ to ½ teaspoon of ground cinnamon into the basic glaze mixture. This spiced glaze complements cinnamon-raisin scones perfectly, or adds an delightful extra layer of flavor to plain or apple-infused scones.
- Rich Maple Glaze: For a deep, earthy, and naturally sweet flavor profile, replace a portion of the milk in your glaze with pure maple syrup. A tiny dash of maple extract can be added to further intensify and round out the rich maple flavor.
Baking Success: Expert Tips & Troubleshooting for Perfect Scones
To ensure your scones are consistently light, beautifully flaky, and supremely tender with every single bake, keep these expert tips and common troubleshooting advice in mind. Mastering these fundamental techniques will help you confidently navigate potential pitfalls and consistently achieve bakery-quality results right in your own kitchen.
- Accurate Flour Measurement is Paramount: As we’ve emphasized, precisely measuring your flour is an absolute cornerstone of scone baking success. Always employ the “spoon and level” technique: gently spoon the all-purpose flour into your dry measuring cup until it slightly overflows, then use the back of a straight-edged knife or similar tool to level off the excess without compacting the flour. Never scoop flour directly from the bag with your measuring cup, as this compresses the flour and can add significantly more than the recipe intends, inevitably leading to dense, heavy, and dry scones.
- Embrace the Cold Principle: Cold ingredients, particularly the butter, are your most valuable allies in the quest for perfect scones. The colder your butter and heavy cream remain throughout the preparation process, the better. A crucial step is chilling the cut scones on the baking sheet for 5-10 minutes in the freezer just before they go into the oven. This quick chill helps to re-solidify the tiny butter bits, ensuring they release maximum steam during baking, which is key for an exceptional rise and remarkable flakiness. Never skip this vital chilling step!
- The Magic of a Cream Wash: Before you slide your perfectly formed scones into the preheated oven, take a moment to lightly brush their tops with a little extra heavy whipping cream. This simple yet effective step serves multiple beneficial purposes: it encourages the scones to develop a beautiful, enticing golden-brown color, contributes to a wonderfully subtle crispy exterior, and imparts an additional touch of richness. For an extra layer of visual appeal and a pleasant textural crunch, you can also sprinkle coarse sugar evenly over the cream-washed scones before baking.
- Avoid Overmixing the Dough at All Costs: This is arguably the single most common and detrimental mistake in scone baking. Once the wet ingredients are introduced to the dry mixture, mix only until the dough *just* comes together and no dry streaks of flour remain. An ideal scone dough will appear somewhat shaggy and slightly crumbly, not smooth and elastic. Overmixing actively develops the gluten in the flour, which will inevitably result in scones that are tough and chewy, rather than beautifully tender and flaky. Always use a light hand and cease mixing as soon as the ingredients are combined.
- Handle the Dough Gently: When it comes to shaping and cutting your scone dough, handle it as minimally and as gently as possible. Warm hands can inadvertently melt the crucial cold butter within the dough, compromising the final texture. When using a cookie cutter or knife, always press straight down and lift the tool directly up; actively avoid twisting your cutter or knife, as this motion can inadvertently seal the edges of the dough, which will inhibit a full, even, and impressive rise during baking.
- Utilize High Heat for a Quick Rise: Scones benefit immensely from being baked at a relatively high oven temperature, typically 400°F (204°C). This initial powerful blast of heat causes the moisture trapped within the cold butter to rapidly convert into steam. This swift steam production creates those coveted pockets of air, promoting a quick and impressive rise before the exterior of the scone has a chance to fully set, ensuring a light and airy result.
- Proper Storage for Freshness: Once your scones have cooled, store them in an airtight container at room temperature for up to 2-3 days, or in the refrigerator for 3-4 days. For longer preservation, unbaked scones can be frozen; simply arrange them on a baking sheet until solid, then transfer to a freezer-safe bag for up to 1 month. Bake from frozen, adding a few extra minutes to the baking time.
The BEST Scones Recipe
Get ready to bake the most incredible scones you’ve ever tasted – incredibly light, wonderfully soft, and bursting with delightful flavor. This meticulously crafted recipe guarantees success, yielding perfectly tender scones every single time!
Overall Rating: 4.96 out of 5 stars based on 198 ratings.
Prep Time: 20 mins
Cook Time: 20 mins
Total Time: 40 mins
Learn how to make delicious, soft, light, and tender scones with this easy recipe and tutorial. Perfect for breakfast, brunch, or dessert!
Ingredients
Yields: 8 scones
For the scones:
- 2 cups (250 grams) all-purpose flour, spooned & leveled
- 1/3 cup (65 grams) granulated sugar
- 1 tablespoon baking powder
- 1/2 teaspoon salt
- 6 tablespoons (85 grams) cold unsalted butter, cubed into pieces
- 1/2 cup (120 ml) heavy whipping cream, plus more for brushing the tops
- 1 large egg
- 1 teaspoon pure vanilla extract
For the vanilla glaze:
- 1 cup (120 grams) powdered sugar
- 1-2 tablespoons (15-30 ml) milk (whole, 2%, 1%, skim, or almond milk all work fine)
- 1/2 teaspoon pure vanilla extract
Instructions
To make the scones:
- Preheat the oven to 400°F (204°C). Line a large baking sheet with parchment paper or a silicone baking mat and set aside.
- In a large mixing bowl, whisk together the flour, granulated sugar, baking powder, and salt. Add the cold cubed butter and use a pastry cutter or fork to cut it into the dry ingredients until you have small pea-sized crumbs.
- In a separate mixing bowl, whisk together the heavy whipping cream, egg, and vanilla extract until fully combined. Add the wet ingredients to the dry ingredients and stir until just combined. The mixture may be a little crumbly at this point; this is okay!
- Scoop the mixture out onto a lightly floured surface and work it together into a ball, then flatten it into a 7-inch circle. Cut the dough into 8 equal-sized pieces and place them on the prepared baking sheet, making sure to leave a little room between each one.
- Place the baking sheet in the freezer for 5-10 minutes or until the scones are thoroughly chilled.
- Brush the tops of each scone with a little heavy whipping cream. If you’re not adding a glaze, you can top them with coarse sugar if desired.
- Bake at 400°F (204°C) for 18-22 minutes or until the tops of the scones are lightly browned and cooked through.
- Remove from the oven and allow to cool completely.
To make the vanilla glaze:
- In a medium-sized mixing bowl, whisk together the powdered sugar, milk, and vanilla extract until well combined. If the glaze is too thick, add more milk to thin it out; if the glaze is too thin, add more powdered sugar to thicken it.
- Top the cooled scones with the glaze and allow it to harden for 10-15 minutes, then serve, and enjoy.
Notes
- Storage: Store scones in an airtight container at room temperature or in the refrigerator for 3-4 days. For longer storage, unbaked scones can be frozen on the baking sheet until solid, then transferred to a freezer bag for up to 1 month. Bake from frozen, adding a few extra minutes to the baking time.
- Milk for Glaze: Whole, 2%, 1%, skim, or almond milk all work fine for the glaze. Adjust consistency as needed for your desired thickness.
- Scone Variations: As mentioned, this recipe is a superb base for customization. Mix in these ingredients right after cutting in the butter and before adding wet ingredients:
- Blueberry: Add 1 cup (150 grams) of fresh blueberries.
- Cranberry Orange: Add 2 teaspoons of fresh orange zest plus 2/3 cup (105 grams) of sweetened dried cranberries (or 1 cup of chopped fresh cranberries).
- Cinnamon Raisin: Add 1 and 1/2 teaspoons of ground cinnamon plus 2/3 cup (105 grams) of raisins.
- Lemon Poppy Seed: Add the zest of 1 medium lemon plus 1/2 tablespoon of poppy seeds.
- Glaze Variations: Customize your glaze by replacing the milk and vanilla as follows:
- Orange Glaze: Omit the vanilla extract and use fresh orange juice in place of the milk.
- Lemon Glaze: Omit the vanilla extract and use fresh lemon juice in place of the milk.
- Cinnamon Glaze: Add 1/4-1/2 teaspoon of ground cinnamon to the basic glaze mixture.
Cuisine: American
Course: Breakfast
Author: Danielle Rye
Share Your Scone Creations!
We absolutely love seeing your baking triumphs and culinary masterpieces! If you made these delightful scones using our recipe, we’d be thrilled if you shared your photos and experiences on Instagram. Don’t forget to mention @livewellbakeoften or tag your posts with #livewellbakeoften. Your delicious creations inspire our entire community of bakers!